HappyCardFactory Designs

Dream. Create. Inspire.

  • Shop
  • Facebook
  • Pinterest
  • Twitter
  • Instagram
  • Home
  • Our Store
  • Blog
  • Tutorials
  • 3D Projects
    • 3D Crafts
    • 3D Flowers
    • 3D Letters
  • Contact
  • About Me
    • About Me
    • Disclosure
    • Privacy Policy
  • Join Our Group
You are here: Home / 3D / Personalized Wood Blocks

Personalized Wood Blocks

September 21, 2013 by Rebecca Wagner Leave a Comment

 
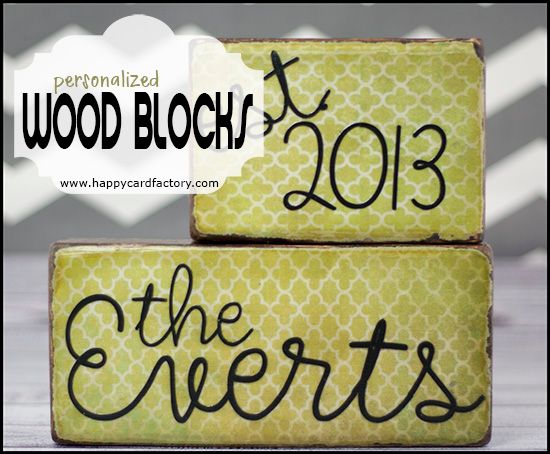
Just like I promised….my homemade wedding gift to a special couple. These were so much fun to make with only a few steps to a great personalized present.
 
 
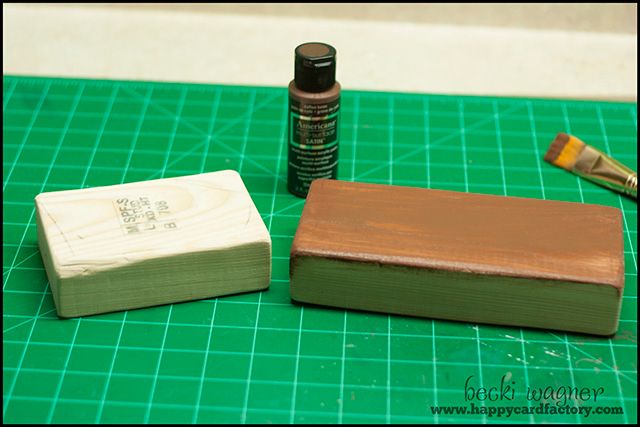
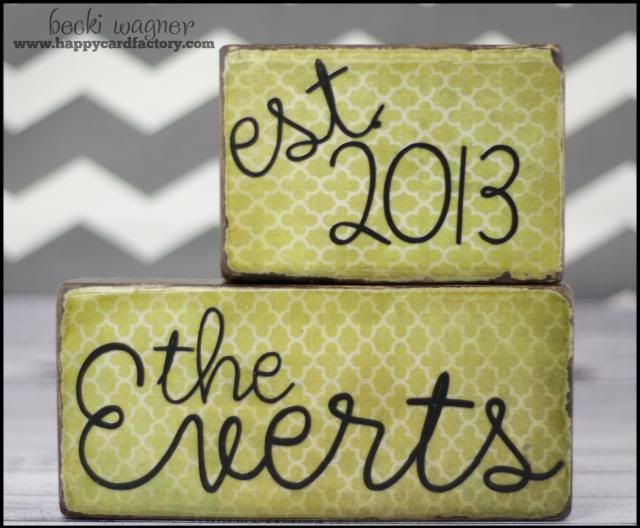
I had my husband cut two blocks for me. The larger is 7.5″ wide and the smaller is 5″ wide. I sanded them to have a slightly rounded edge on the front then painted with the new Americana Multi-Surface Satin. I first painted a base coat of Coffee Bean and then I dry brushed a light coat of Black Tie. Once the paint was dry, I lightly sanded again to give it an aged look.
 
 
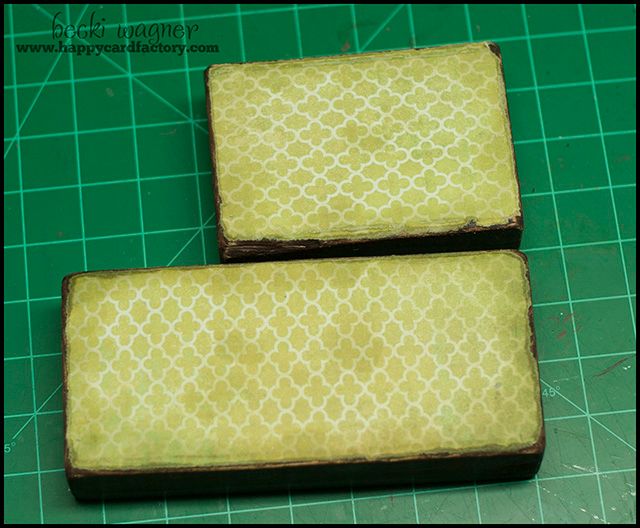
The next step was to get the background paper on. I used a thin coat of Mod Podge to secure my paper. I love how it gives a melted in to the wood look. After about 10 minutes, I sanded the edges of the paper and inked them with Old Paper Distress Ink. Then another thin coat of Mod Podge to adhere the lettering. (side note: while looking at the picture above to write this, I realized I put the paper on in two different directions. I hope to goodness the bride-to-be doesn’t notice…DOH!!)
 
 
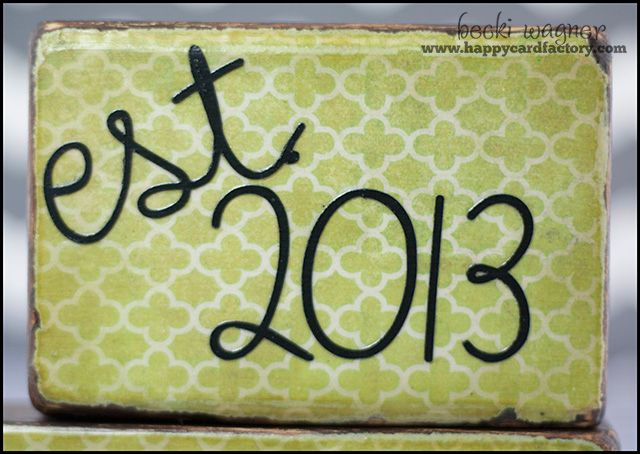
For the lettering, I used my machine and cut three different fonts out to see which one I liked the best. I settled on Cotton Candy by Lettering Delights. I was worried it may be a little too child-like for this project, but it goes very well. After I had the lettering on, another thin coat of Mod Podge. When I was sure all the previous layers were dry, I added two more, drying between each. That’s it, all done! I could have sprayed a matte or gloss sealer over the final layer, but this is not going to see too much action on a fireplace mantel so I think it will be fine as is.


I am happy with how this turned out. Apparently so was the bride-to-be as she ordered two more for her family as Christmas gifts. Gotta love that!

Supplies:
Two pieces of 2×4 cut into 7.5″ and 5″ pieces
Americana Multi-Surface Satin
Mod Podge
Mosaic Memories paper by Recollections
Cotton Candy font by LD
Old Paper Distress Ink

Tip: When adding the Mod Podge after the lettering, be careful when brushing over the letters as it may create bubbles. Go slowly to keep them to a minimum.


Filed Under: 3D, Americana Multi-Surface, gift ideas, home decor, Lettering Delights, Mod Podge

« Autumn Tea Light Holders
{Free Cut File} Pumpkin Gable Box »

Leave a Reply Cancel reply

Your email address will not be published. Required fields are marked *

This site uses Akismet to reduce spam. Learn how your comment data is processed.

About the Designer

Hi, I'm Rebecca. I am a child of God. A loving wife of 29 years. A boy mom. A collector of gadgets, gizmos, and superhero action figures. Making the world more organized one planner at a time. Read More…

  • Facebook
  • Instagram
  • Pinterest
  • Twitter

Looking for Something?

Categories

Copyright

You are welcome to feature or share any article, as long as you use only one image and link back to the specific post. You may NOT edit, crop, remove my watermark, or change my images in any way without written permission.

Republishing posts in their entirety is prohibited. If I somehow produce something that inspires you to create your own, please credit me and link back to my site. Thanks!
  • Blog
  • Home
  • Tutorials
  • About Me
  • Contact Me
  • 3D Projects
  • CGP VIP Group

Join us on Instagram

Foil lovers... we heard you. Since our foil equi Foil lovers... we heard you. 

Since our foil equipment went down, the messages and emails have not stopped. We know how much you love the look and honestly we love it too.

Replacing commercial foil equipment runs into the tens of thousands of dollars and, like a lot of small businesses right now, that's just not realistic. 

After months of testing with our existing setup, we think we found a way to bring foil back.

It's not mass factory perfect. Occasionally there may be a tiny spot where the foil doesn't pull 100%. Nothing obvious, nothing we wouldn't personally use, and nothing that doesn't meet our standards will ship.

But overall? We think it looks pretty gorgeous.

Before we officially bring foil back…

Would you still want it knowing it's handcrafted and not machine perfect? 

Tell me honestly in the comments. Your feedback will decide this one. 

#foilinserts #foilingtechnique #citygirlplannersinserts #citygirlplanners
Now on to the cutting phase. #citygirlplanners # Now on to the cutting phase. 

#citygirlplanners #stationerylove #plannercommunity #behindthescenes
New notepads in the making. Any guesses? #citygir New notepads in the making. Any guesses?

#citygirlplanners #plannercommunity #plannerlove #citygirlplannersinserts
Nothing ruins a perfectly good month like… bills Nothing ruins a perfectly good month like… bills.

Good news: when everything’s written down, at least the chaos is organized.

Pay it. Check it off. Pretend you’re thriving.

#CityGirlPlanners #AdultingButMakeItCute #BillTracker #PlannerLife #OrganizedChaos
Personal Size planners get a bad rap for one reaso Personal Size planners get a bad rap for one reason…

They’re narrow.

And I get it.
Personal is the perfect middle ground. Bigger than Pocket, fits in your purse, but way more portable than A5.

But the width?
That’s always been the complaint.

Lately I’ve been seeing people try to squeeze Personal Wide into standard Personal binders… and then wonder why the pages stick out.

So instead of making it wider… I went the other direction.

Foldouts.

For 2026, I reworked the layout to give you more planning space without changing the footprint.

Month on one page
Straight into your weekly
Dashboard space (because you know I had to keep that)
And when it’s folded?
Standard Personal Size. Fits your binder like it should.

Now I need your opinion before I finalize this…

What works better in vertical boxes?

Graph (left side)
or
Lines (right side)

Tell me in the comments — Graph or Lines?
Who else misses Micro planners? I found this under Who else misses Micro planners? I found this under a stack of papers. Don’t know how long it’s been chillin under there but I’m going to start using it. Great for quick notes and things you need to dump but don’t need long term.
Field research, planner style. Since the Coach no Field research, planner style.

Since the Coach notebooks are sold out, I grabbed this leather cover on Amazon to test the fit.
Good news: it fits beautifully (and it’s roomy enough for tabs).

Bad news?
I got excited and didn’t read the whole listing.

No snap.
No elastic.
Just vibes.

Luckily I’ve got elastic on hand… but consider this your reminder from someone who learned the hard way:

Read the full listing, friends.

#plannerlife #plannercommunity #a5planner #plannerfinds #citygirlplanners
Sometimes the best combinations aren’t planned… they just happen.

The Aquarelle Sky cover paired with Candy Rush tabs turned out to be one of those moments. The colors line up so perfectly, it looks like they were made for each other.

Just a little unexpected color magic.
Every tab is placed by hand. Nothing here is auto Every tab is placed by hand.

Nothing here is automated. We print, cut, laminate, punch, and assemble every order ourselves.

When you shop with us, two real humans have touched every single piece.

#smallbusinesslife #madebyhand #behindthescenes #plannercommunity  #shopsmallbusiness
Follow Us!

Categories

Archives

Copyright © 2026 · HappyCardFactory Designs