HappyCardFactory Designs

Dream. Create. Inspire.

  • Shop
  • Facebook
  • Pinterest
  • Twitter
  • Instagram
  • Home
  • Our Store
  • Blog
  • Tutorials
  • 3D Projects
    • 3D Crafts
    • 3D Flowers
    • 3D Letters
  • Contact
  • About Me
    • About Me
    • Disclosure
    • Privacy Policy
  • Join Our Group
You are here: Home / Autumn / Autumn Tea Light Holders

Autumn Tea Light Holders

September 19, 2013 by Rebecca Wagner Leave a Comment

From the November/December 2012 issue of CuttingEdge Magazine.

 
Sometimes trying to find the perfect seasonal decor within your budget seems futile, not to mention time consuming.  Being a crafter means even though you might have the money to purchase the items, you earn the satisfaction of making it yourself.  That’s where the real fun is!
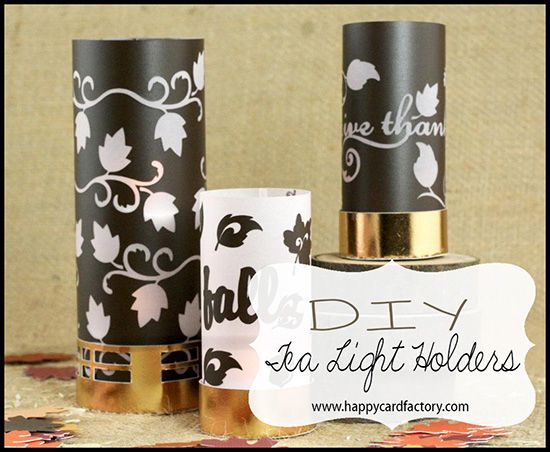
Here is a step-by-step tutorial for making your own battery operated tea light holders.  Please make sure you use only battery operated tea lights with this project; otherwise, you could start a fire.  I’m sure you all knew that though. 😉 These holders could also serve as a wrap for the taller flameless candles.  The size and design possibilities are endless.
 
Supplies:
 
Cut Files: (base, leaves, scrolls, and lettering) Lettering Delights; Cardstock: (clear) Vellum, (brown) Vinyl; Tools: Boss Kut Gazelle, Make the Cut software, transfer tape.
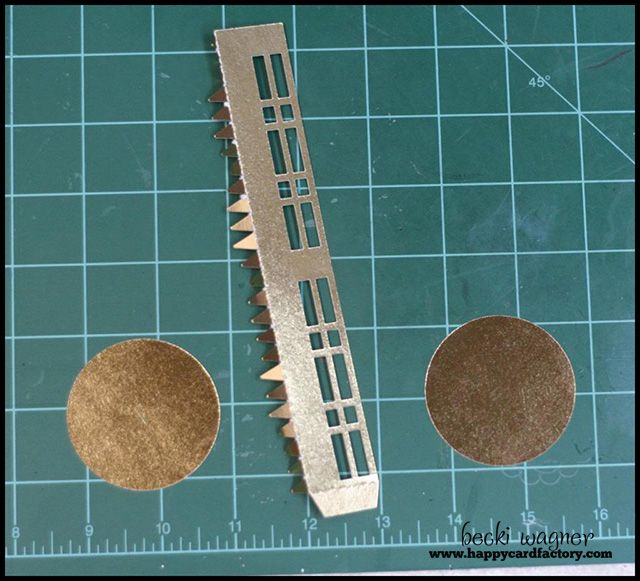
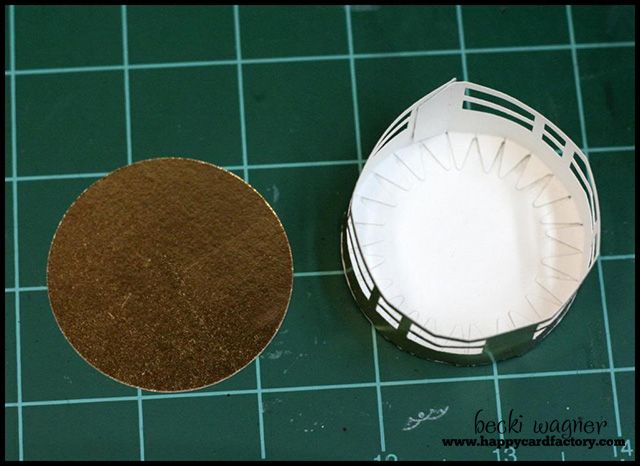
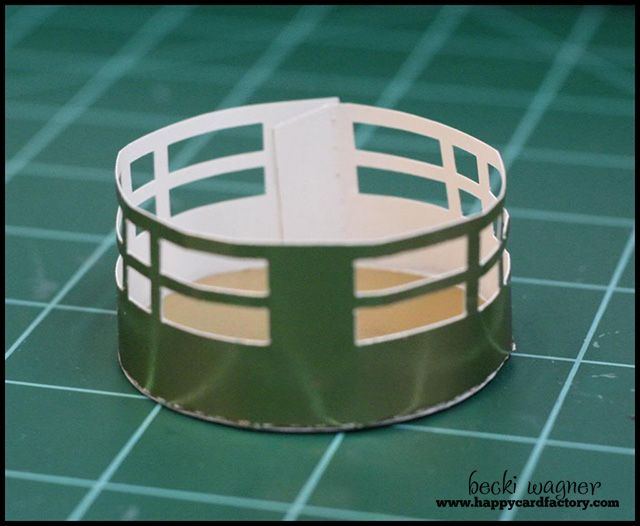
  • Cut out round base in slightly bigger than the circumference of your candle (use the side length as a guide, you want your candle to fit snug).
  • Glue base together making sure the teeth go to the edge of the circle to ensure your candle will fit.
 
  • Design your wrap in your favorite software program. Make sure the circumference is slightly bigger than the candle for adhesive purposes.
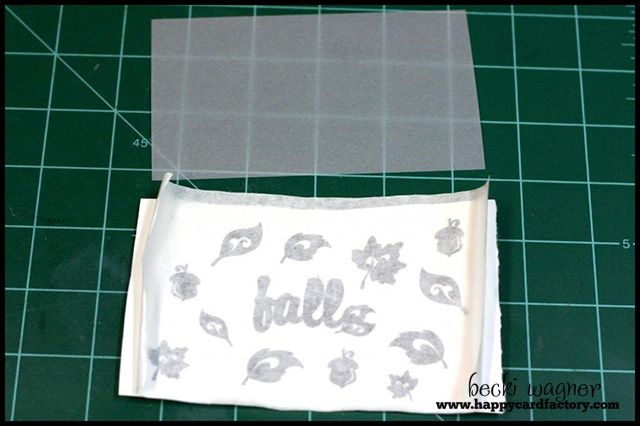
  • Place vinyl on mat and cut out your designs. Cut your vellum the same length and width as your vinyl.
 
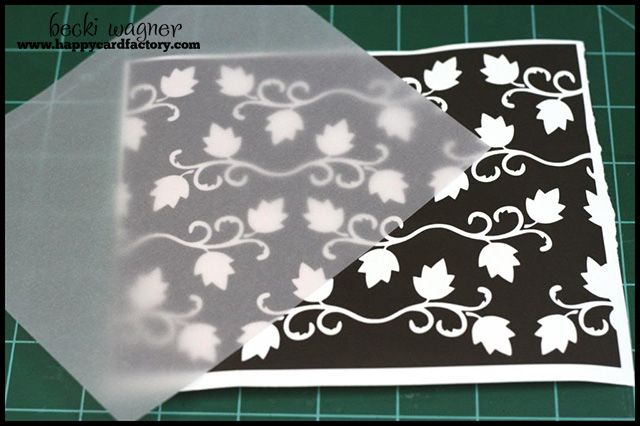
  • Weed your design. When you are finished, place transfer tape onto vinyl.
  • Carefully peel backing off vinyl and place evenly onto the vellum.
 
  • Roll vellum into a cylinder making sure it is slightly bigger than the candle.
  • Glue along edge lengthwise.
  • Slip into base you made earlier.
  • Drop in the tea light and enjoy the soft glow!
 
 
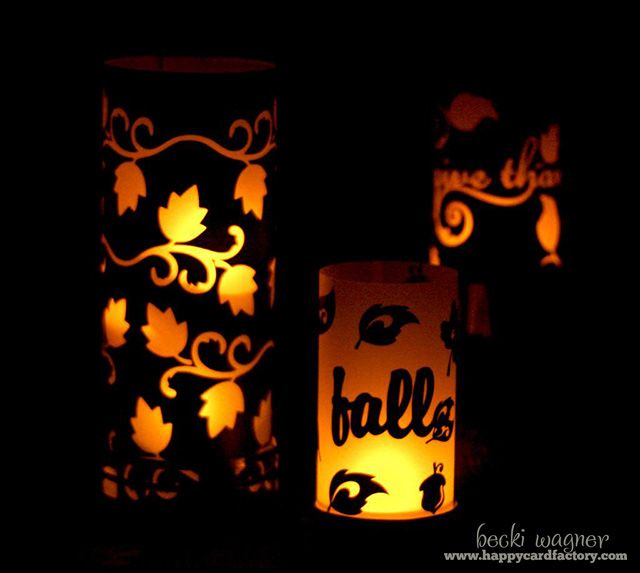
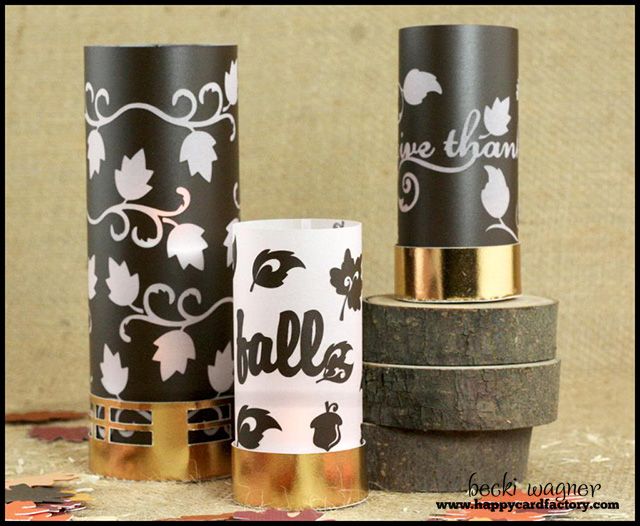
Tips: Use larger bases to get a fuller, less bullet-like look.  Stack smaller tea lights on top of each other to fill up a taller holder.
 

Link Parties:
The Inspired Room


Filed Under: Autumn, Boss Kut Gazelle, Fall, home decor, Lettering Delights, tutorial

« Personalized Fall Banner
Personalized Wood Blocks »

Leave a Reply Cancel reply

Your email address will not be published. Required fields are marked *

This site uses Akismet to reduce spam. Learn how your comment data is processed.

About the Designer

Hi, I'm Rebecca. I am a child of God. A loving wife of 29 years. A boy mom. A collector of gadgets, gizmos, and superhero action figures. Making the world more organized one planner at a time. Read More…

  • Facebook
  • Instagram
  • Pinterest
  • Twitter

Looking for Something?

Categories

Copyright

You are welcome to feature or share any article, as long as you use only one image and link back to the specific post. You may NOT edit, crop, remove my watermark, or change my images in any way without written permission.

Republishing posts in their entirety is prohibited. If I somehow produce something that inspires you to create your own, please credit me and link back to my site. Thanks!
  • Blog
  • Home
  • Tutorials
  • About Me
  • Contact Me
  • 3D Projects
  • CGP VIP Group

Join us on Instagram

Foil lovers... we heard you. Since our foil equi Foil lovers... we heard you. 

Since our foil equipment went down, the messages and emails have not stopped. We know how much you love the look and honestly we love it too.

Replacing commercial foil equipment runs into the tens of thousands of dollars and, like a lot of small businesses right now, that's just not realistic. 

After months of testing with our existing setup, we think we found a way to bring foil back.

It's not mass factory perfect. Occasionally there may be a tiny spot where the foil doesn't pull 100%. Nothing obvious, nothing we wouldn't personally use, and nothing that doesn't meet our standards will ship.

But overall? We think it looks pretty gorgeous.

Before we officially bring foil back…

Would you still want it knowing it's handcrafted and not machine perfect? 

Tell me honestly in the comments. Your feedback will decide this one. 

#foilinserts #foilingtechnique #citygirlplannersinserts #citygirlplanners
Now on to the cutting phase. #citygirlplanners # Now on to the cutting phase. 

#citygirlplanners #stationerylove #plannercommunity #behindthescenes
New notepads in the making. Any guesses? #citygir New notepads in the making. Any guesses?

#citygirlplanners #plannercommunity #plannerlove #citygirlplannersinserts
Nothing ruins a perfectly good month like… bills Nothing ruins a perfectly good month like… bills.

Good news: when everything’s written down, at least the chaos is organized.

Pay it. Check it off. Pretend you’re thriving.

#CityGirlPlanners #AdultingButMakeItCute #BillTracker #PlannerLife #OrganizedChaos
Personal Size planners get a bad rap for one reaso Personal Size planners get a bad rap for one reason…

They’re narrow.

And I get it.
Personal is the perfect middle ground. Bigger than Pocket, fits in your purse, but way more portable than A5.

But the width?
That’s always been the complaint.

Lately I’ve been seeing people try to squeeze Personal Wide into standard Personal binders… and then wonder why the pages stick out.

So instead of making it wider… I went the other direction.

Foldouts.

For 2026, I reworked the layout to give you more planning space without changing the footprint.

Month on one page
Straight into your weekly
Dashboard space (because you know I had to keep that)
And when it’s folded?
Standard Personal Size. Fits your binder like it should.

Now I need your opinion before I finalize this…

What works better in vertical boxes?

Graph (left side)
or
Lines (right side)

Tell me in the comments — Graph or Lines?
Who else misses Micro planners? I found this under Who else misses Micro planners? I found this under a stack of papers. Don’t know how long it’s been chillin under there but I’m going to start using it. Great for quick notes and things you need to dump but don’t need long term.
Field research, planner style. Since the Coach no Field research, planner style.

Since the Coach notebooks are sold out, I grabbed this leather cover on Amazon to test the fit.
Good news: it fits beautifully (and it’s roomy enough for tabs).

Bad news?
I got excited and didn’t read the whole listing.

No snap.
No elastic.
Just vibes.

Luckily I’ve got elastic on hand… but consider this your reminder from someone who learned the hard way:

Read the full listing, friends.

#plannerlife #plannercommunity #a5planner #plannerfinds #citygirlplanners
Sometimes the best combinations aren’t planned… they just happen.

The Aquarelle Sky cover paired with Candy Rush tabs turned out to be one of those moments. The colors line up so perfectly, it looks like they were made for each other.

Just a little unexpected color magic.
Every tab is placed by hand. Nothing here is auto Every tab is placed by hand.

Nothing here is automated. We print, cut, laminate, punch, and assemble every order ourselves.

When you shop with us, two real humans have touched every single piece.

#smallbusinesslife #madebyhand #behindthescenes #plannercommunity  #shopsmallbusiness
Follow Us!

Categories

Archives

Copyright © 2026 · HappyCardFactory Designs