HappyCardFactory Designs

Dream. Create. Inspire.

  • Shop
  • Facebook
  • Pinterest
  • Twitter
  • Instagram
  • Home
  • Our Store
  • Blog
  • Tutorials
  • 3D Projects
    • 3D Crafts
    • 3D Flowers
    • 3D Letters
  • Contact
  • About Me
    • About Me
    • Disclosure
    • Privacy Policy
  • Join Our Group
You are here: Home / home decor / Trendy Twine Suncatcher

Trendy Twine Suncatcher

January 16, 2013 by Rebecca Wagner 37 Comments

When thinking about my next Trendy Twine Design Team project, I thought what is the craziest way you could use twine? Probably as a suncatcher, right? I mean, it’s not the most see through material on the planet. But could it be done? After a little research I found a cool way to get more use out of my stockpile of twine. Let’s take a look at how to make a suncatcher with my favorite twine.

 
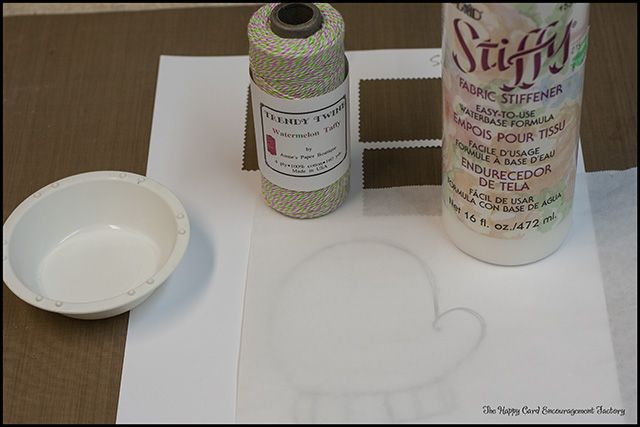
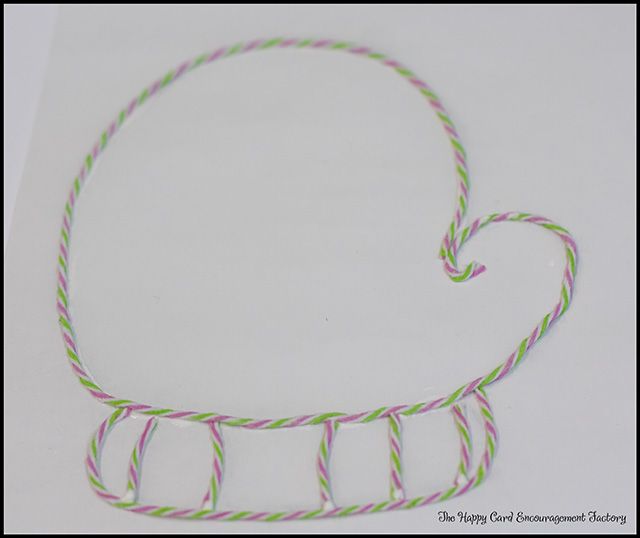
First, gather your materials – fabric stiffener, twine, pattern, foam brush, glue, and wax paper. I forgot to add the glue bottle and stamp to the above picture, so pretend they are there. I used the big background mitten stamp from Unity Stamp Co. for the suncatcher’s shape. You want to use the twine as the outline for your catcher and to hold all the glue in. Start by putting the pattern under the wax paper (shiny side up) and lay down a very thin line of glue tracing the pattern. This is just to keep the twine down on the paper and keep it’s shape till you coat it with the stiffener. Let dry for about 10 minutes. Then using a foam brush, sponge on the stiffener. Soaking the twine but making sure you don’t let it leak out around it.
 
 
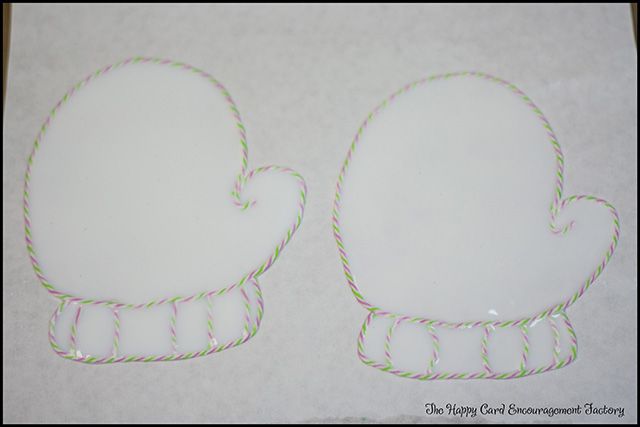
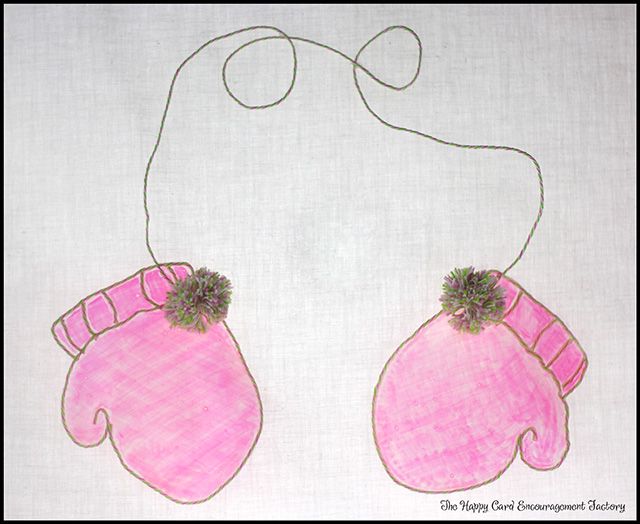
I made two of the mittens for a set. I should have reversed the pattern on the mitten to look like left and right, but I am lazy. I will just flip one over. Once you are sure the twine is stuck, fill in the entire mitten with glue. I used just your run of the mill cheap school glue. I don’t know if it is glue specific but expect some shrinkage and Mod Podge doesn’t work so well. You may want to take a pin and pop any bubbles you see now. I forgot to pop them and they show up. Let these dry till they are totally clear. I left them alone for three days. They may have been done earlier but didn’t check only because I got busy.
 
 
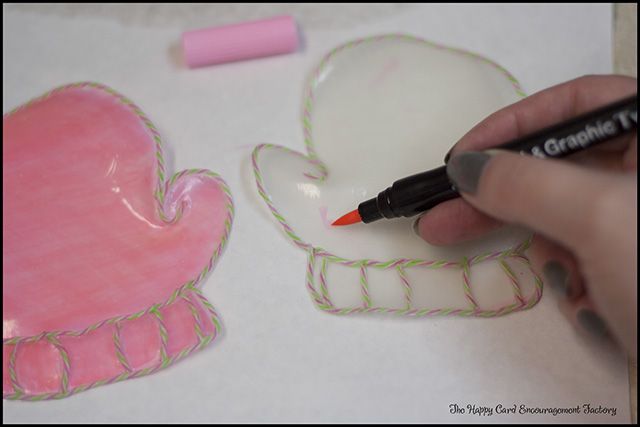
Once they are dry, gently peel them off the wax paper. Because of the shrinkage, they might curl a bit. I kind of liked it. It gave my mittens a little style. If it was a different shape, you may not want any curl. So just be careful when peeling it from the paper. Peeling the paper away instead may prevent that. I wanted to give a little color to my mittens, so I used a pink marker. I colored in a criss cross pattern to mimic knit for extra interest. 
 
 
If you want a string to connect the mittens for hanging or just looks, take the stiffener to extra twine. As you see here I also made cute little pom-poms. I tried for weeks to get a nice bright picture of these hanging on my kitchen window with the sun shining through, but as my luck would have it, no sunny days. My pictures were coming out terrible. These look like they are laying down. They are not. I rigged up my light box and hung them on a background and placed a light behind it. It doesn’t give the full suncatcher effect, but I hope you can still see the nice transparency to them. I hung them here and on my window with glue dots, they are very secure.
 
 
Here is a closer look. They really look quite pretty in the kitchen even though we haven’t see the sun in weeks. They make me happy just looking at them. 
 
 
Hope you enjoyed today’s project and my tutorial made sense. If you have any questions, hit me up in the comments and I will get back as soon as possible. Have a great day and happy crafting!
 
Supplies:
Watermelon Taffy Trendy Twine
Big Background Mitten by Unity Stamp Co.
Kuretake ZIG Art & Graphic Twin marker in pink
Stiffy Fabric Stiffener
wax paper
school glue
foam brush


Filed Under: home decor, Kuretake ZIG, suncatcher, Trendy Twine, Unity Stamp Co., Winter

« Vintage Button Card Tag
Coffee Cup Trendy Tags »

Comments

  1. -Candi says

    January 16, 2013 at 1:29 pm

    SHUT UP! What a neat idea, and I can’t decide if I want to show my daughter…. she’d love it, but I also enjoy being able to see out my windows and I know every inch will be covered LOL

    Reply
  2. Yvonne says

    January 16, 2013 at 2:40 pm

    Such a fun project! May have to share this with my girls. 🙂

    Reply
  3. Kate says

    January 16, 2013 at 4:43 pm

    Very Cute. Awesome Tutorial.

    Reply
  4. snappy scrappy says

    January 16, 2013 at 7:16 pm

    Fun idea!! Lee-Ann 🙂

    Reply
  5. Trendy Twine says

    January 17, 2013 at 2:54 am

    Wow! You put a lot of work into these mittens. I’ve never seen anything like them. This is so creative and they turned out so beautiful.

    Lesley @ Trendy Twine

    Reply
  6. Sukie says

    January 17, 2013 at 4:40 am

    Super creative project. Thanks for the tutorial!

    Reply
  7. TeresaK says

    January 17, 2013 at 2:54 am

    Shut the front door! LOL! This is an amazingly creative idea!!
    Teresa
    http://www.createenjoyshare.blogspot.com

    Reply
  8. ~Suzy~ says

    January 17, 2013 at 2:20 pm

    This reminds me of those flowers I used to make with wire and glue stuff!(Am I showing my age?) But these are even nicer! The pom pom is super super cute!

    Reply
  9. Helen says

    January 17, 2013 at 9:46 pm

    This is such a neat idea!!

    Reply
  10. Jessica Pascarella says

    January 18, 2013 at 4:06 pm

    So clever! Great project! Thanks for sharing!

    Reply
  11. Beth M says

    January 18, 2013 at 9:06 pm

    Very creative. Thanks for sharing.

    Reply
  12. Chris D. says

    January 18, 2013 at 9:12 pm

    Cool beans! What an awesome idea! Love it!

    Reply
  13. Meredith Adolf says

    January 18, 2013 at 10:02 pm

    Wow, this is a great idea! Good job!

    Reply
  14. Julie Odil says

    January 18, 2013 at 10:50 pm

    This is so creative! Love the idea!

    Reply
  15. Angel says

    January 18, 2013 at 11:26 pm

    Wow I never thought of this. This is indeed the craziest way you can use twine! Love those big huge mittens

    Reply
  16. Ruby says

    January 19, 2013 at 12:02 am

    Fun project.

    Reply
  17. FeistyCrafter says

    January 19, 2013 at 12:16 am

    This is such a cute idea!!

    Reply
  18. Paula-Scrap Addict says

    January 19, 2013 at 12:23 am

    fun idea! I used this stamp myself this week but not for FWF

    Reply
  19. Diana Fernandez says

    January 19, 2013 at 1:21 am

    wow this is super cute!!! what a fabulous idea!

    Reply
  20. Corrie says

    January 19, 2013 at 3:37 am

    Great idea I would never have thought of that

    Reply
  21. Scrappin' Diva says

    January 19, 2013 at 4:15 am

    What a fantastic idea! Never would have thought of this. TFS!

    Reply
  22. Becky Sorensen says

    January 19, 2013 at 4:38 am

    That is a great idea. I might have to try that with the nephews on a no school day!! Thanks.

    Reply
  23. Gwen says

    January 19, 2013 at 5:28 am

    Aww, so adorable!! Sweet idea!

    Reply
  24. SherylK says

    January 19, 2013 at 6:51 am

    Very cute idea. I did something like that but just made squiggle patterns on plastic….with glitter!

    Reply
  25. Rebecca Wagner says

    January 19, 2013 at 3:19 pm

    Thank you all for the sweet comments!

    Reply
  26. Mary Anne / MA54K says

    January 19, 2013 at 11:43 am

    Thanks for the tutorial! How fun!

    Reply
  27. jennifer mitten says

    January 19, 2013 at 12:36 pm

    What a fabulous idea!

    Reply
  28. Kary says

    January 19, 2013 at 2:21 pm

    Such a lovely project!! Thanks for the tutorial 🙂

    Reply
  29. Angie Blom says

    January 19, 2013 at 2:31 pm

    Super cool project!!

    Reply
  30. JPScraps says

    January 20, 2013 at 1:50 am

    Super cute! And a great idea!

    Reply
  31. Crystal says

    January 20, 2013 at 2:48 pm

    What a fun and clever project, thanks for the tutorial!

    Reply
  32. Jen says

    January 20, 2013 at 10:05 pm

    What a clever idea!

    Reply
  33. Sue D says

    January 21, 2013 at 2:04 am

    Very clever idea!

    Reply
  34. Designs that Delight says

    January 26, 2013 at 1:51 am

    This is such a cute idea! Thanks for the step by step tutoria!

    Reply
  35. Jamie says

    January 26, 2013 at 11:49 am

    Awesome idea!

    Reply
  36. Therese says

    January 27, 2013 at 1:16 am

    That is such a cool idea, I love the DIY window décor idea!

    Reply
  37. Beth Jackson Klosterboer says

    January 30, 2013 at 2:38 am

    What a fun project!

    Reply

Leave a Reply Cancel reply

Your email address will not be published. Required fields are marked *

This site uses Akismet to reduce spam. Learn how your comment data is processed.

About the Designer

Hi, I'm Rebecca. I am a child of God. A loving wife of 29 years. A boy mom. A collector of gadgets, gizmos, and superhero action figures. Making the world more organized one planner at a time. Read More…

  • Facebook
  • Instagram
  • Pinterest
  • Twitter

Looking for Something?

Categories

Copyright

You are welcome to feature or share any article, as long as you use only one image and link back to the specific post. You may NOT edit, crop, remove my watermark, or change my images in any way without written permission.

Republishing posts in their entirety is prohibited. If I somehow produce something that inspires you to create your own, please credit me and link back to my site. Thanks!
  • Blog
  • Home
  • Tutorials
  • About Me
  • Contact Me
  • 3D Projects
  • CGP VIP Group

Join us on Instagram

✨ Flipping through the magic of October with the ✨ Flipping through the magic of October with these new Halloween-themed journaling prompts. 🍁🖤 Whether you’re diving deep into reflection or just savoring the season’s mystique, these cards are your autumn muse. Now available on our website for those who’ve been asking. Happy journaling! 🎃📖 #OctoberWhispers #JournalJourney #citygirlplanners #journalingprompts #journaling #octoberprompts
Unlock 2024 with style! ✨ Dive into the year wit Unlock 2024 with style! ✨ Dive into the year with our CityGirl Monthly Spiral Bound Planner 📖, Amethyst Geode cover edition. Sized 7” x 9” with a sleek 5/8” coil - simplicity and elegance combined! 💜

#PlannerAddict #PlannerLove #CityGirlPlanner #2024Goals #TrendingNow #ViralPick #SpiralPlannerLove #AmethystGeode #PlannerGlowUp #PlanWithMe #2024Ready #MonthlyPlanning #EleganceInPlanning #CoilPerfection #PlannerTrend
Popping out pillows because buying is too mainstre Popping out pillows because buying is too mainstream! 💨📦 When it’s cheaper to make your own air pillows than purchase! 😂 Click the link in bio to grab your perfect spiral planner packed with care! ✨ 

#AirPillowMadness #PackingGoals #PlannerAddict #SmallBusinessLove #ViralPost #TrendingNow #SavingCoins #BusinessBehindTheScenes #spiralplannerlove #citygirlplanners
Everyone loves pink, right? #comingsoon #pinkpink Everyone loves pink, right?

#comingsoon #pinkpinkpink #pinkplanner #pink #plannertabs #plannerstickers #stickerstabs #citygirlplanners
Witches brew, and plan too! Keep your eye on the ( Witches brew, and plan too! Keep your eye on the (crystal) ball for #WitchyPlans. 🌙🎃

#SneakPeek #CityGirlPlanners #PlanLikeAWitch #SpookyStationery #MagicalMoments #SpellboundPlanning #HauntinglyOrganized #PlanningCommunity #PlannerLove #NotepadAddict
Turning coffee breaks into a planner party with th Turning coffee breaks into a planner party with these Latte Love CityGirl notebooks. 📚☕️ Because pink and gold are always a match made in stationery heaven! ✨💖 #PlannerAddict #CityGirlPlanners #PinkAndGold #CoffeeLovers #DeskGoals #PlannerLove #PlanWithMe #PlannerCommunity #PlannerChic
Coming soon - October Journaling Cards!. These giv Coming soon - October Journaling Cards!. These give all the spooky vibes…perfect for the autumn season. I couldn’t wait to show you. So, I grabbed them fresh off the printer. These are full color but the sneaks in black and white. We are still testing which card stock we want to use but they will be coated like playing cards. Should there be a November and December set too?

#bulletjournal #journaling #journalinspiration #journalcard #pocketcard #october #halloweenjournaling #carddeck #sneakpeek #newrelease #citygirlplanners #plannerlife #plannercommunity #fauxoilpainting
From fashionista to undead diva! 🧟‍♀️✨S From fashionista to undead diva! 🧟‍♀️✨Should I bring her to life as a vinyl sticker? Drop a 💚 if that’s a yes!

Artwork by @sav.nicholls321 

#artprogress #zombiedoll #artist #zombies #vinylsticker #citygirlplanners #planningcommunity #plannerstickers #plannernerd
Hey there, CityGirl family! Imagine your Spirals w Hey there, CityGirl family! Imagine your Spirals with a splash of color! Are you feeling the vibes?

We’re thinking of introducing a color theme add-on. From classic black to a spectrum of choices.

But here’s the twist: We need YOUR take! Should we dive into this colorful journey together?

Give us a double click if you love the idea or drop your thoughts in the comments. We’re all ears!

#citygirlspiral #citygirlplanners #funcolors #planningcommunity #planningtime #plannerlove
Follow Us!

Categories

Archives

Copyright © 2023 · HappyCardFactory Designs