HappyCardFactory Designs

Dream. Create. Inspire.

  • Shop
  • Facebook
  • Pinterest
  • Twitter
  • Instagram
  • Home
  • Our Store
  • Blog
  • Tutorials
  • 3D Projects
    • 3D Crafts
    • 3D Flowers
    • 3D Letters
  • Contact
  • About Me
    • About Me
    • Disclosure
    • Privacy Policy
  • Join Our Group
You are here: Home / Christmas / ‘Tis The Season Wood Sign

‘Tis The Season Wood Sign

November 18, 2012 by Rebecca Wagner 3 Comments

I am so excited to share with you today a project that has been on my list for a very long time.  I guess I just needed the right tools for the job. That’s what happened when Kuretake sent me some Woodcraft markers to check out.  Can I say I am in love!  I now have three more projects in mind for these bad boys. Let me show how easy it is to make your own sign you can proudly hang in your home.

First I started with an inexpensive piece of craft plywood.  These are available at most big box craft stores. The piece I purchased was 6×12 and a quarter inch thick.  I lightly sanded the entire piece, rounded the edges, and applied a thin layer of sealer.

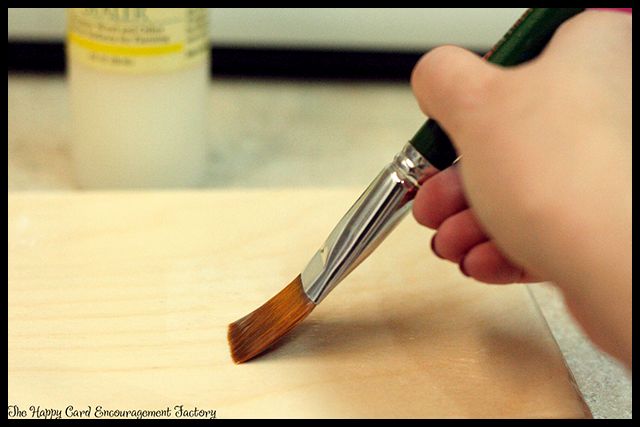
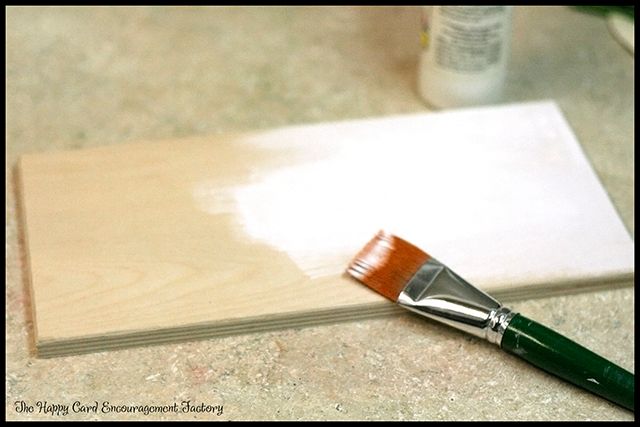
After the sealer no longer felt tacky to the touch I brushed on two coats of white paint, letting them dry between coats.

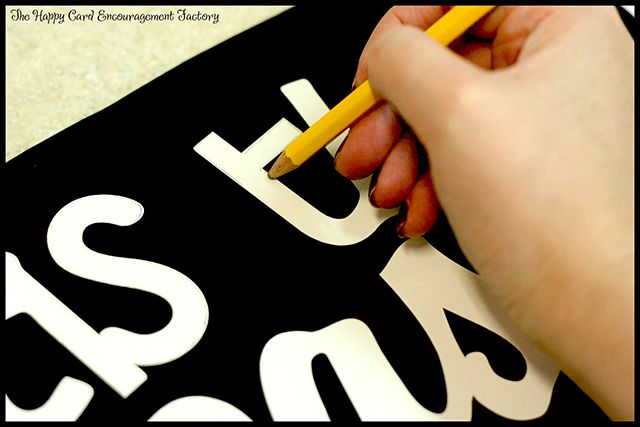
To get my lettering perfect, I cut my sentiment out of vinyl with my die cutter.  I didn’t want to have problems with the pattern moving, that’s why I choose to stick it down.  If you don’t have any vinyl, you can use any kind of paper and cut it out yourself.  I just have very caffeinated hands. 😛

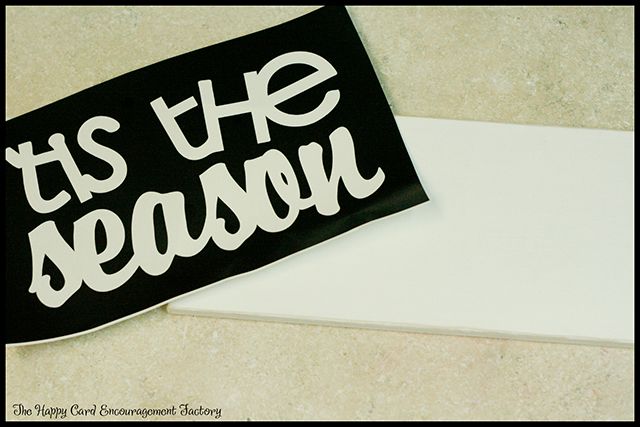
After placing the vinyl down in the center of the plank, I used a pencil to outline the letters.  I did not use a lot of pressure to keep the lines very light.

I choose not to use the markers to just color in with the vinyl on.  I wanted to avoid any chance of bleeding and retain a hand drawn look to it.

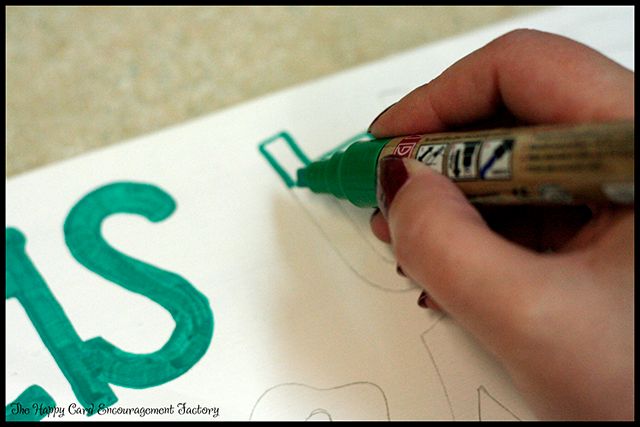
Once I finished outlining all the letters, I removed the vinyl and started coloring the first line in Bright Green.

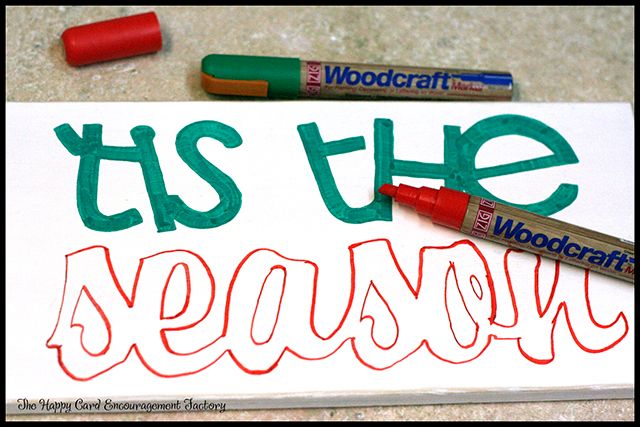
Then I proceeded to color in the bottom word with Crimson.  I let the words dry for about 15 minutes between the two coats.  Remember, if you want to erase the pencil marks, do not let the marker touch the lines.  They will be set in once the wood marker is down.  The colors I used were dark enough that I wasn’t worried about the lines.  But if you were to use a light colored marker, I would stay just inside the lines so I could erase later.  Just to be safe, I let my sign dry overnight then sprayed the entire piece with a matte sealer.  The finishing touch was two brackets on the back for a beautiful sign to hang and admire.

So, was that super easy or what?  How cool would this be to make a few and give out as gifts at Christmas?  I love it.  I am off to go make a few more with other holiday greetings.  Have a great day and happy crafting!

Supplies:
Kuretake Woodcraft markers in Bright Green and Crimson
Craft Plywood
2 Picture Hangers
Peppermint Holiday Expressions by Lettering Delights

Filed Under: Christmas, home decor, Kuretake ZIG, Lettering Delights

« Trendy Twine Birthday Hop
Advent Calendar Pad »

Comments

  1. Mel - The Paper Retreat says

    November 19, 2012 at 5:38 pm

    Becki, this is so fun! I love it!

    Reply
    • Rebecca Wagner says

      November 21, 2012 at 2:01 pm

      Thanks, Mel!

      Reply
  2. Merry says

    November 23, 2012 at 6:58 am

    This does look terrific and great idea creating the stencil to do the letters.

    Reply

Leave a Reply Cancel reply

Your email address will not be published. Required fields are marked *

This site uses Akismet to reduce spam. Learn how your comment data is processed.

About the Designer

Hi, I'm Rebecca. I am a child of God. A loving wife of 29 years. A boy mom. A collector of gadgets, gizmos, and superhero action figures. Making the world more organized one planner at a time. Read More…

  • Facebook
  • Instagram
  • Pinterest
  • Twitter

Looking for Something?

Categories

Copyright

You are welcome to feature or share any article, as long as you use only one image and link back to the specific post. You may NOT edit, crop, remove my watermark, or change my images in any way without written permission.

Republishing posts in their entirety is prohibited. If I somehow produce something that inspires you to create your own, please credit me and link back to my site. Thanks!
  • Blog
  • Home
  • Tutorials
  • About Me
  • Contact Me
  • 3D Projects
  • CGP VIP Group

Join us on Instagram

Does anyone else suddenly become a pink-and-purple Does anyone else suddenly become a pink-and-purple person in February…
or is it just me?

I don’t even fight it anymore.
February = soft colors, cozy plans, and a planner that matches the mood. 💕

#februaryvibes #plannercommunity #pinkplanner #plannerlove #citygirlplanners
Behind the scenes at CityGirl Planners. No factor Behind the scenes at CityGirl Planners.

No factories.
No automation.
Just Chris, a laminator, and a whole lot of patience.

Every tab you flip?
Hand-fed. Hand-finished. Hand-checked.

Small business life isn’t glamorous… but it is made with care.

#citygirlplanners #smallbusinesslife #plannercommunity #behindthescenes #plannerlove
Botanical Notes are officially live 🌿 I was ab Botanical Notes are officially live 🌿

I was able to scale them all the way down to Pocket Size, so they’re now available in every size we offer: Pocket, Personal, Half Size, A5, and Classic.

Same clean layout, same calm vibe, just more size options.

#plannercommunity #citygirlplanners #stationerylove #plannerrefills #citygirlplans
Fueling the Plan cover ☕✨ Because big ideas do Fueling the Plan cover ☕✨
Because big ideas don’t happen without caffeine, cute stationery, and a plan that actually gets written down. Spiral-bound, 6 x 8, and ready to live in your bag, your desk, or your favorite coffee shop booth.

This one’s for the list-makers, dream-chasers, and “one more coffee then I’ll start” crowd. 💅📓

#FuelingThePlan #SpiralNotebook #PlannerGirl #CityGirlPlanners #CoffeeAndPlans
Because I know someone was going to ask 😌 Yes, Because I know someone was going to ask 😌
Yes, our A5 inserts do fit in a Coach Notebook with top tabs — you just need an A5 ring adapter.
This one’s from The Life Paperie on Etsy and it’s a solid little workaround.

#A5Planner #PlannerSetup #RingPlanner #PlannerInserts #PlannerAccessories
New year. Blank slate. Same chaos, better paper. B New year. Blank slate.
Same chaos, better paper.
Botanical Notes, ready when you are.

#blankslate #newyearpages #botanicalnotes #stationerylover #plannerinspo
You asked. We’re answering. (Just… give us a m You asked. We’re answering.
(Just… give us a minute 😉)

We’re taking our most-loved functional inserts and rolling them into our gradient print lineup, starting with the classics you use every single month. This one’s the Monthly Bills tracker in Lilac Hex, and honestly… paired with pink? She understood the Valentine’s Day assignment 💕

More favorites. More gradients. Same no-nonsense function.
Slow rollout, zero chaos. Worth the wait.

💜💗

#plannerinserts #functionalplanning #billtracker #plannercommunity #plannerlove #gradientplanner #lilachex #pinkplanner #valentinesvibes #ringbinderplanner #planningwithstyle #stationerylove #plannerflatlay #organizedlife #citygirlplanners
From loose pages to a finished love story. 📓✨ From loose pages to a finished love story.
📓✨

This 6x8 spiral notebook pairs the Swept Away cover with our Botanical Notes dot grid inside—soft florals, clean space, and just enough structure to catch all the thoughts that refuse to stay quiet.

Printed, punched, coiled, trimmed—every step done by hand.
Because some stories deserve better than a boring notebook.

#spiralnotebook
#handmadepaper
#stationeryshop 
#notebookreel
#plannercommunity
#bookishvibes
#romancenotebook
We won’t lie, we miss the foil. ✨ But when our We won’t lie, we miss the foil. ✨
But when our foiling machine officially kicked the bucket, we rolled up our sleeves and got creative instead.

Meet the four new gradients stepping in as foil’s glow-up cousins. No drama, just smooth color and crisp prints. And judging by the reviews… yeah, people are loving them.

Sometimes Plan B turns out pretty darn good. 💁‍♀️
Follow Us!

Categories

Archives

Copyright © 2026 · HappyCardFactory Designs