HappyCardFactory Designs

Dream. Create. Inspire.

  • Shop
  • Facebook
  • Pinterest
  • Twitter
  • Instagram
  • Home
  • Our Store
  • Blog
  • Tutorials
  • 3D Projects
    • 3D Crafts
    • 3D Flowers
    • 3D Letters
  • Contact
  • About Me
    • About Me
    • Disclosure
    • Privacy Policy
  • Join Our Group
You are here: Home / 3D / Rockets Red Glare

Rockets Red Glare

July 31, 2012 by Rebecca Wagner 14 Comments

Hello faithful readers.  Thanks for stopping by again to check out my latest project.  If you are coming from my Trendy Twine post, I thank you too for visiting.  Stop and stay awhile and oogle all my other Trendy Twine related projects.  There are quite a few.  I am rather obsessed with my Trendy.  ^__^Anyhoo, on to my project.  Seeing as my nephew is obsessed with Buzz Lightyear lately, I decided to make him a rocket ship mobile with trailing stars to hang in his room.  He loves it already and has been caught a few times walking around with it while Aunt Becki was still putting it together.

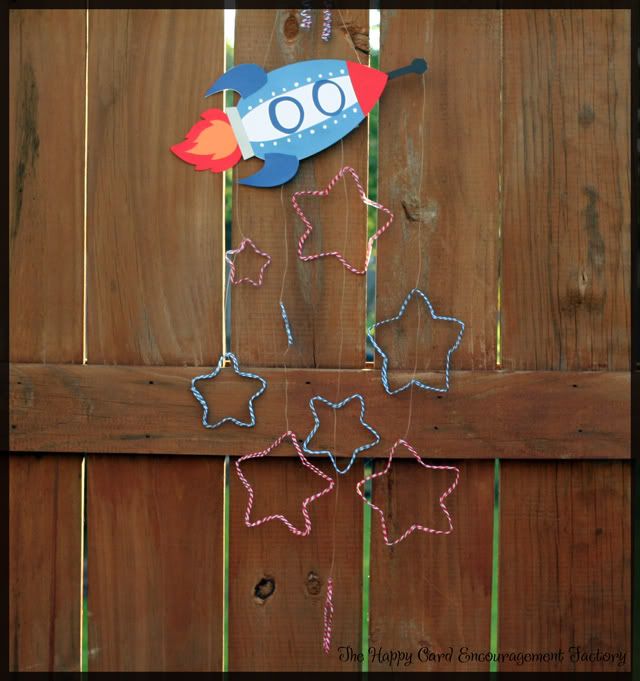
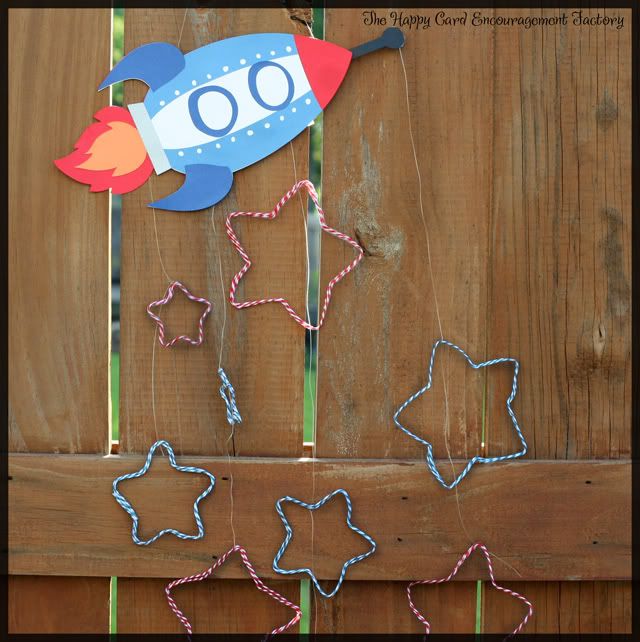
I really need to rig up a bigger lightbox for larger projects like this one.  Just couldn’t get good light when it was hanging in any room.  I don’t like taking pictures outside because it is so windy here and everything blows around. *shrugs*  I just hope you guys can get an idea of how this will hang and see the stars good enough.

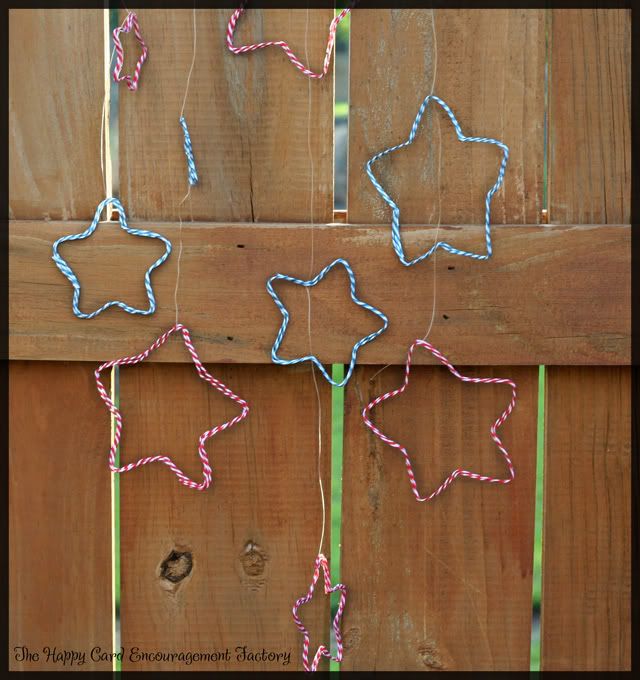
Speaking of stars, these are super easy to make.  Time consuming but easy.  I just happen to have three different sized plastic star cookie cutters.  You need a star shaped cookie cutter, foam brush, Stiffy, and Trendy Twine.  I slowly wrapped the twine around the outside of the cutter, sponging Stiffy as I went to stick the twine, making sure it was bending to the nook and crannies.  It was be messy but I made sure to really soak it.  Otherwise, the twine will want to pop up and not keep its shape.  I let them sit overnight to insure they were dry all the way through.

When I was ready to slide them off the cutter, I took a butter knife and ran it around the edges like you would for brownies (mmmm, brownies…) in the pan.  There may be some extra Stiffy attached to the stars.  Just cut that away.  The stars are going to be soft, so I wouldn’t man handle them too much.  But the good news about that is if a 2 year old comes by and tries to make them a square, you can just bend them back into shape.  Ask me how I know that.  If you have any other questions about the stars or my project in general, just leave a comment and I will get back as soon as possible.  I am working on only a few hours of sleep and not sure my explanation is making sense.  But most of you should be used to my nonsensical ramblings by now.

Supplies:
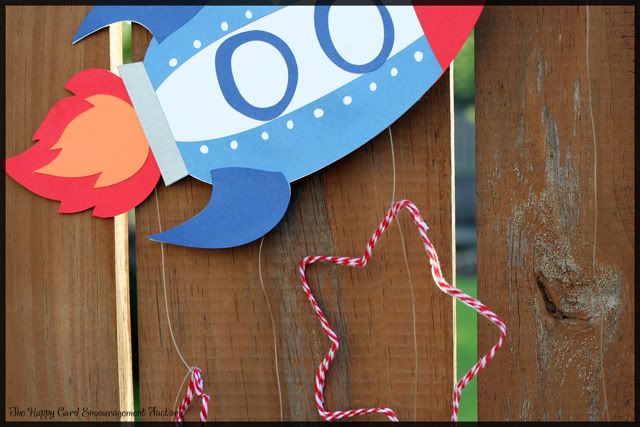
Rocket Ship Cut-It by Lettering Delights
Fishing line
Stiffy fabric stiffener by Plaid
Star shaped cookie cutters
Berry & Blue Berry Trendy Twine

Filed Under: 3D, home decor, Lettering Delights, Trendy Twine

« Super Hero Blog Hop
Snips and Snails »

Comments

  1. Trendy Twine says

    July 31, 2012 at 2:24 pm

    This is awesome, Becki. Love the stars. You put a lot of work into them and it paid off. They are fabulous.

    Lesley @ Trendy Twine

    Reply
  2. Kate says

    July 31, 2012 at 1:03 pm

    Definitely think of brownies now my friend, LOL. Awesome job on this. I really love that space rocket it looks great especially the stars using the trendy twine. Love how it turned out.

    Reply
  3. Anita says

    July 31, 2012 at 1:11 pm

    I love how cute this is, what a great mobile for a little boy. Awesome job. Hugs, Anita

    Reply
  4. Wida says

    July 31, 2012 at 1:13 pm

    really cool, great job with thinking outside the box when it comes to twine!! I like that lettering delights, they have cute images.

    Reply
  5. Margaret says

    July 31, 2012 at 3:34 pm

    What a wonderful project! I’m sure your nephew loved it and loves it hanging in his room. Super job!!

    Reply
  6. Mel - The Paper Retreat says

    August 1, 2012 at 1:01 am

    So cute Becki! Love the rockets in the stars!

    Reply
  7. Rebecca Wagner says

    August 1, 2012 at 1:09 am

    Thank you all!

    Reply
  8. Jani Lewis says

    August 1, 2012 at 7:47 am

    So cute and clever. Love those stars.

    Reply
  9. Jessica Pascarella says

    August 3, 2012 at 9:58 pm

    Super cute idea! Love it!

    Reply
  10. Sukie says

    August 4, 2012 at 2:49 am

    Such a cute project, love the look of the stars, very creative!

    Reply
  11. Helen says

    August 4, 2012 at 2:02 am

    Thanks for sharing how you made the stars–I have a lot of cookie cutters I could try this with šŸ™‚

    Reply
  12. Paula Gale says

    August 4, 2012 at 5:44 am

    Hi there – completely found your blog by accident (and hopping around). Love this project – inspired idea to make those stars… what a lovely gift to your nephew – I guess you’re going to be his favourite Auntie Beckie following this project. Love the rocket ship from LD too.

    Paula Gale (UK)
    xxx

    Reply
  13. Rebecca Wagner says

    August 4, 2012 at 1:30 pm

    Thank you all for the wonderful comments!

    Reply
  14. Alyssa Leanne says

    August 11, 2012 at 1:09 am

    Becki this is sooo cute, I just love your tutorials!

    <3 Alyssa

    Reply

Leave a Reply Cancel reply

Your email address will not be published. Required fields are marked *

This site uses Akismet to reduce spam. Learn how your comment data is processed.

About the Designer

Hi, I'm Rebecca. I am a child of God. A loving wife of 29 years. A boy mom. A collector of gadgets, gizmos, and superhero action figures. Making the world more organized one planner at a time. Read More…

  • Facebook
  • Instagram
  • Pinterest
  • Twitter

Looking for Something?

Categories

Copyright

You are welcome to feature or share any article, as long as you use only one image and link back to the specific post. You may NOT edit, crop, remove my watermark, or change my images in any way without written permission.

Republishing posts in their entirety is prohibited. If I somehow produce something that inspires you to create your own, please credit me and link back to my site. Thanks!
  • Blog
  • Home
  • Tutorials
  • About Me
  • Contact Me
  • 3D Projects
  • CGP VIP Group

Join us on Instagram

Some days the bar is high. Some days the bar is si Some days the bar is high.
Some days the bar is simply… still here.

And that’s something.

Meet the Still Here Notepad.
A gentle reset for the days that hurt, when the smallest wins still count.

Because sometimes the most important thing you do all day…
is keep going.

#citygirlplanners #plannerlove #notepad
We’ve got some good ones! #citygirlplanners #pl We’ve got some good ones!

#citygirlplanners #plannercommunity #plannerrefills #plannerstuff
Just waiting on that UAP info to drop. šŸ¤”šŸ˜ # Just waiting on that UAP info to drop. šŸ¤”šŸ˜

#unicornsfromuranus #citygirlplanners #plannerlife #stationerylove
So, I did a thing. Working on a pain point for Per So, I did a thing. Working on a pain point for Personal size. This is for those of you who think it’s too narrow but don’t want to purchase a new PW binder. Franklin Covey Compact is the next best thing. 

If you have a FFC binder already, we now will have refills for you too! 

#franklincoveycompact #citygirlplanners #personalringplanner #lvmmagenda
Foil lovers... we heard you. Since our foil equi Foil lovers... we heard you. 

Since our foil equipment went down, the messages and emails have not stopped. We know how much you love the look and honestly we love it too.

Replacing commercial foil equipment runs into the tens of thousands of dollars and, like a lot of small businesses right now, that's just not realistic. 

After months of testing with our existing setup, we think we found a way to bring foil back.

It's not mass factory perfect. Occasionally there may be a tiny spot where the foil doesn't pull 100%. Nothing obvious, nothing we wouldn't personally use, and nothing that doesn't meet our standards will ship.

But overall? We think it looks pretty gorgeous.

Before we officially bring foil back…

Would you still want it knowing it's handcrafted and not machine perfect? 

Tell me honestly in the comments. Your feedback will decide this one. 

#foilinserts #foilingtechnique #citygirlplannersinserts #citygirlplanners
Now on to the cutting phase. #citygirlplanners # Now on to the cutting phase. 

#citygirlplanners #stationerylove #plannercommunity #behindthescenes
New notepads in the making. Any guesses? #citygir New notepads in the making. Any guesses?

#citygirlplanners #plannercommunity #plannerlove #citygirlplannersinserts
Nothing ruins a perfectly good month like… bills Nothing ruins a perfectly good month like… bills.

Good news: when everything’s written down, at least the chaos is organized.

Pay it. Check it off. Pretend you’re thriving.

#CityGirlPlanners #AdultingButMakeItCute #BillTracker #PlannerLife #OrganizedChaos
Personal Size planners get a bad rap for one reaso Personal Size planners get a bad rap for one reason…

They’re narrow.

And I get it.
Personal is the perfect middle ground. Bigger than Pocket, fits in your purse, but way more portable than A5.

But the width?
That’s always been the complaint.

Lately I’ve been seeing people try to squeeze Personal Wide into standard Personal binders… and then wonder why the pages stick out.

So instead of making it wider… I went the other direction.

Foldouts.

For 2026, I reworked the layout to give you more planning space without changing the footprint.

Month on one page
Straight into your weekly
Dashboard space (because you know I had to keep that)
And when it’s folded?
Standard Personal Size. Fits your binder like it should.

Now I need your opinion before I finalize this…

What works better in vertical boxes?

Graph (left side)
or
Lines (right side)

Tell me in the comments — Graph or Lines?
Follow Us!

Categories

Archives

Copyright © 2026 · HappyCardFactory Designs