HappyCardFactory Designs

Dream. Create. Inspire.

  • Shop
  • Facebook
  • Pinterest
  • Twitter
  • Instagram
  • Home
  • Our Store
  • Blog
  • Tutorials
  • 3D Projects
    • 3D Crafts
    • 3D Flowers
    • 3D Letters
  • Contact
  • About Me
    • About Me
    • Disclosure
    • Privacy Policy
  • Join Our Group
You are here: Home / 3D / Rosette Christmas Trees

Rosette Christmas Trees

December 10, 2015 by Rebecca Wagner Leave a Comment

Rosette Christmas Trees 2

Wow, it’s amazing what you find hidden when you are transferring files to a new computer. I had totally forgot to post my Rosette Christmas trees from 2 years ago. Yes, that’s right. I made these for our Ladies Christmas banquet in 2013. Man, I get more forgetful the older I get. 

Rosette Christmas tree 3

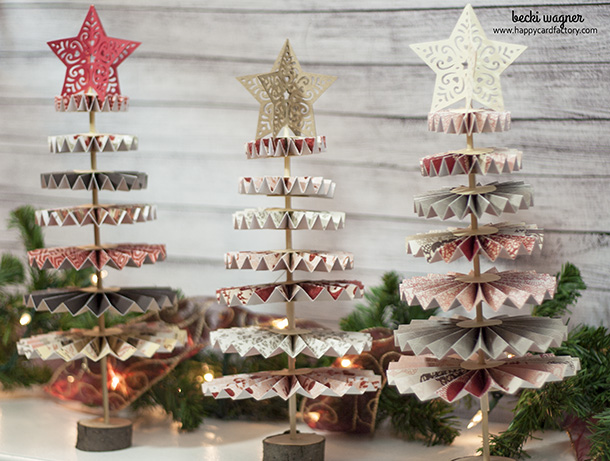
The rosette trees are pretty straight forward. My husband sliced wood discs from a branch, then drilled a hole about a quarter of an inch deep in the top for the skewers to sit in. I added a bit of hot glue in the hole before putting the skewer sticks in. To make the rosettes attach to the sticks, you want to make them a little different than normal. Instead of just gluing them to a paper disc, you want to punch a hole in the middle the size of your stick. If it’s slightly smaller, that’s fine. Just don’t make it bigger or the disc will slide down the stick. Also, make sure when attaching the rosette, it doesn’t cover the hole. Get it gathered as close together as you can without meeting in the middle like you normally would make a rosette.

Rosette Christmas tree 1

As you can probably see, you will need a few sizes of rosettes. For the life of me I cannot remember what size I made my strips. Going out on a limb and saying that the biggest had to be 12″ or less due to paper and cutting mat size. For the star, it was a Cricut cartridge. Again, I don’t remember which one as a friend cut them for me because I don’t have that machine. I do know that there were four die cuts folded and glued together. The fancy star really adds to bring the rosette Christmas trees to the next level.

OA Rosette Christmas tree

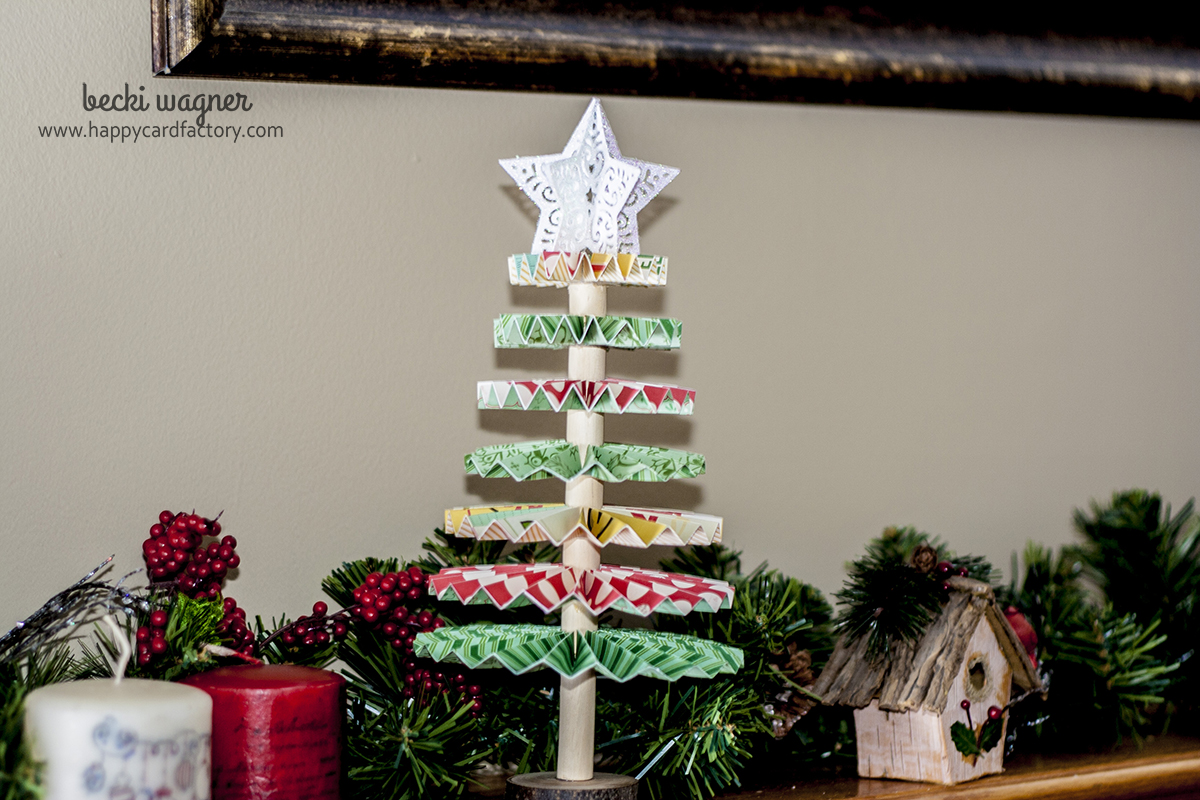
Once again, the ladies were asking if they could take the decorations home. That always makes working so hard every year worth it. I decided to try to construct the rosette Christmas tree with a wooden dowel that was much thicker than the skewers.  I think it looks OK, but it was definitely easier using the paper discs. Hopefully, I can get some Christmas crafting in this year. Time is running out.

Filed Under: 3D, Christmas, gift ideas, home decor, homemade, Lettering Delights, My Minds Eye, October Afternoon

« Celebration Veteran’s Day Sale!
St. Patrick’s Day Planner Clips »

Leave a Reply Cancel reply

Your email address will not be published. Required fields are marked *

This site uses Akismet to reduce spam. Learn how your comment data is processed.

About the Designer

Hi, I'm Rebecca. I am a child of God. A loving wife of 29 years. A boy mom. A collector of gadgets, gizmos, and superhero action figures. Making the world more organized one planner at a time. Read More…

  • Facebook
  • Instagram
  • Pinterest
  • Twitter

Looking for Something?

Categories

Copyright

You are welcome to feature or share any article, as long as you use only one image and link back to the specific post. You may NOT edit, crop, remove my watermark, or change my images in any way without written permission.

Republishing posts in their entirety is prohibited. If I somehow produce something that inspires you to create your own, please credit me and link back to my site. Thanks!
  • Blog
  • Home
  • Tutorials
  • About Me
  • Contact Me
  • 3D Projects
  • CGP VIP Group

Join us on Instagram

Some days the bar is high. Some days the bar is si Some days the bar is high.
Some days the bar is simply… still here.

And that’s something.

Meet the Still Here Notepad.
A gentle reset for the days that hurt, when the smallest wins still count.

Because sometimes the most important thing you do all day…
is keep going.

#citygirlplanners #plannerlove #notepad
We’ve got some good ones! #citygirlplanners #pl We’ve got some good ones!

#citygirlplanners #plannercommunity #plannerrefills #plannerstuff
Just waiting on that UAP info to drop. 🤔😏 # Just waiting on that UAP info to drop. 🤔😏

#unicornsfromuranus #citygirlplanners #plannerlife #stationerylove
So, I did a thing. Working on a pain point for Per So, I did a thing. Working on a pain point for Personal size. This is for those of you who think it’s too narrow but don’t want to purchase a new PW binder. Franklin Covey Compact is the next best thing. 

If you have a FFC binder already, we now will have refills for you too! 

#franklincoveycompact #citygirlplanners #personalringplanner #lvmmagenda
Foil lovers... we heard you. Since our foil equi Foil lovers... we heard you. 

Since our foil equipment went down, the messages and emails have not stopped. We know how much you love the look and honestly we love it too.

Replacing commercial foil equipment runs into the tens of thousands of dollars and, like a lot of small businesses right now, that's just not realistic. 

After months of testing with our existing setup, we think we found a way to bring foil back.

It's not mass factory perfect. Occasionally there may be a tiny spot where the foil doesn't pull 100%. Nothing obvious, nothing we wouldn't personally use, and nothing that doesn't meet our standards will ship.

But overall? We think it looks pretty gorgeous.

Before we officially bring foil back…

Would you still want it knowing it's handcrafted and not machine perfect? 

Tell me honestly in the comments. Your feedback will decide this one. 

#foilinserts #foilingtechnique #citygirlplannersinserts #citygirlplanners
Now on to the cutting phase. #citygirlplanners # Now on to the cutting phase. 

#citygirlplanners #stationerylove #plannercommunity #behindthescenes
New notepads in the making. Any guesses? #citygir New notepads in the making. Any guesses?

#citygirlplanners #plannercommunity #plannerlove #citygirlplannersinserts
Personal Size planners get a bad rap for one reaso Personal Size planners get a bad rap for one reason…

They’re narrow.

And I get it.
Personal is the perfect middle ground. Bigger than Pocket, fits in your purse, but way more portable than A5.

But the width?
That’s always been the complaint.

Lately I’ve been seeing people try to squeeze Personal Wide into standard Personal binders… and then wonder why the pages stick out.

So instead of making it wider… I went the other direction.

Foldouts.

For 2026, I reworked the layout to give you more planning space without changing the footprint.

Month on one page
Straight into your weekly
Dashboard space (because you know I had to keep that)
And when it’s folded?
Standard Personal Size. Fits your binder like it should.

Now I need your opinion before I finalize this…

What works better in vertical boxes?

Graph (left side)
or
Lines (right side)

Tell me in the comments — Graph or Lines?
Who else misses Micro planners? I found this under Who else misses Micro planners? I found this under a stack of papers. Don’t know how long it’s been chillin under there but I’m going to start using it. Great for quick notes and things you need to dump but don’t need long term.
Follow Us!

Categories

Archives

Copyright © 2026 · HappyCardFactory Designs