HappyCardFactory Designs

Dream. Create. Inspire.

  • Shop
  • Facebook
  • Pinterest
  • Twitter
  • Instagram
  • Home
  • Our Store
  • Blog
  • Tutorials
  • 3D Projects
    • 3D Crafts
    • 3D Flowers
    • 3D Letters
  • Contact
  • About Me
    • About Me
    • Disclosure
    • Privacy Policy
  • Join Our Group
You are here: Home / Boss Kut Gazelle / Spring is in the Air

Spring is in the Air

March 15, 2012 by Rebecca Wagner 14 Comments

Looking for the $20 Lettering Delights Giveaway?  Click “Kiss Me” for details!

Wait till you see the crafty project I have for you today!  It’s adorable but the best part is that is was super easy!  So, without further delay, I present you with my Spring is in the Air wreath!

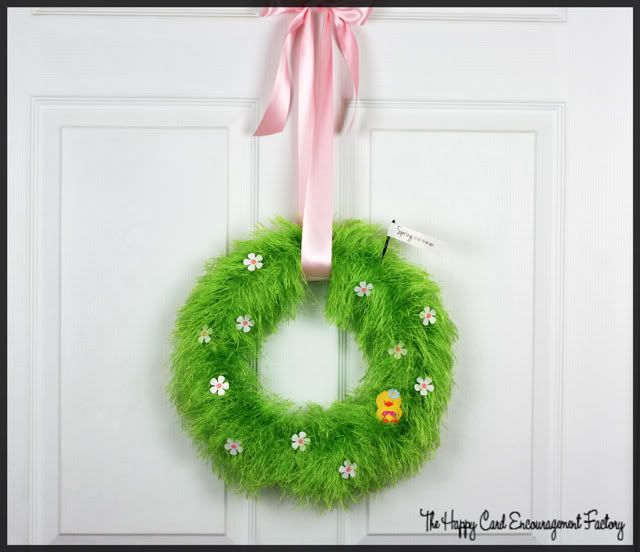
Isn’t it the cutest evar!?!  As most of my friends know, I am hyper-critical of everything I make.  I can never get over the perceived flaws.  Not this little beauty.  She is going to hang on the back door facing the inside.  I don’t know if I will even put it away during the other seasons. LOL  Of course, this fantastic idea came from Pinterest.  I would love to give credit but there was no website link and it wasn’t in English, so I don’t even have a name.

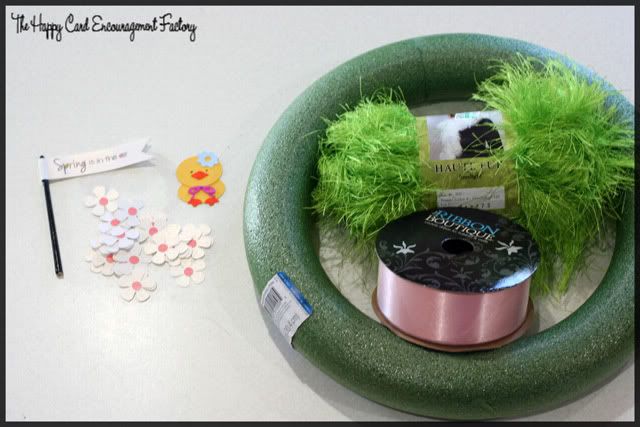
The great thing is you only need a few things to create this beautiful wreath.  To start, I cut out the embellishments on my Gazelle.  The flowers and chick are from Boss Kut Designs, I used 0504Dfiftiesflower and 0637DEasterchick.  These designs are just perfect for a Spring themed project like this one.  I just adore the chubby little body on the chickie.  Kinda reminds me of me.  hehe  Both pieces to the Fifties Flower were cut on white metallic paper.  I then took my dauber dipped in ColorBox Fluid Chalk Ink Pad in Rose Coral to give color to the middles.  It gave me just the pink I was looking for with a more fluid, 3D look.  The flowers are one inch and the chick is two.

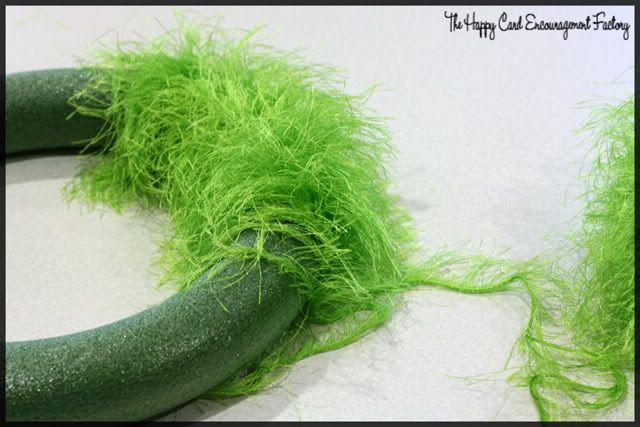
After you have all your embellishments, just start wrapping the wreath with the fur.   Fluffing as you go.  I used a 8″ wreath with Haute Fur in Limelight.  (FYI:  I was told that Haute Fur and other eyelash yarns are being discontinued.  It took me four big box craft stores to find a grass green.  If this is true, you better run out and stock up if you want to make this project.  ^__^)  

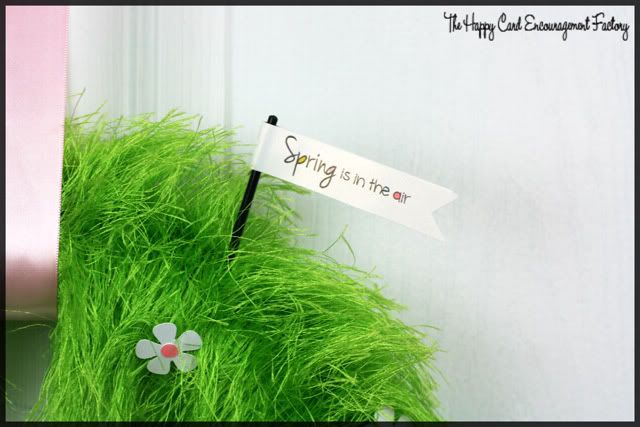
I’m sorry to say a paint brush lost it’s life in the making of this wreath.  But some of us have to suffer for our art. *tsktsk*  I really wasn’t going to make this wreath without the sign after I saw the new My Thoughts Exactly Easter Greetings stamp set.  It really makes the whole scene, if you ask me.  Which I know you didn’t.  Anyway, moving on….After picking my sentiment, I used four of my Spectrum Noir markers to color in the letters. 

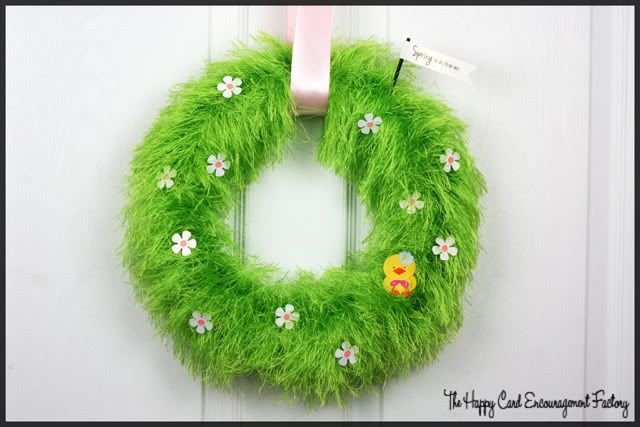
After you have wrapped the wreath and put together your embellishments, all you have to do is hot glue them on and tie a pretty ribbon.  The pink ribbon I used here is 1 1/2″ wide.

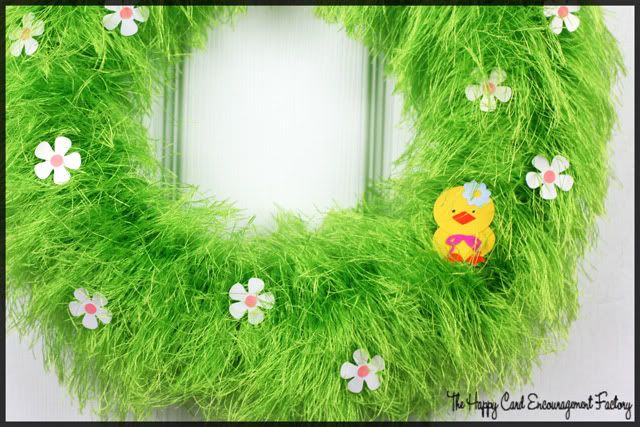
Now you are done!  Sit back and admire your handiwork.  This project is so simple it should be a crime.  Here’s another close-up.  I just love this so much I couldn’t stop taking pictures.  See how the flowers and chickie pop against the green grass?  Love it!  Well, what do you guys think?  Leave me some love in the comments.  Have a great day and happy crafting!

Supplies:
0504Dfiftiesflower by Boss Kut
0637DEasterchick by Boss Kut
Easter Greetings by My Thoughts Exactly
Spectrum Noir alcohol markers for sign
8″ foam wreath
Recollections Metallics paper in white (flowers & sign)
1 1/2″ wide ribbon


Filed Under: Boss Kut Gazelle, home decor, My Thoughts Exactly, Spring, tutorial

« Lil’ Irish Cutie
Butterfly Catch-All »

Comments

  1. MichelleMyBelle says

    March 15, 2012 at 4:52 pm

    Can’t get much more spring than that! Love it. And so easy and quick to make. Looks so nice hanging on a door.

    Reply
  2. Queenie says

    March 15, 2012 at 6:15 pm

    Like it,love it …..want it,lol!!
    Gorrrrrrgeous..spring is in the air everywhere i turn around..hmmhmmhmmm..sorry just sitting here singing…Fabulous!!
    Hugs
    OXOXOX
    P.S snap now following too.

    Reply
  3. SugarGem says

    March 15, 2012 at 6:20 pm

    Wow this is so unbelievably CUTE!!

    Reply
  4. Becki says

    March 15, 2012 at 8:39 pm

    Thanks, ladies! I just came upstairs from my craft room and it is so humid, his hair is hanging low. LOL

    Reply
  5. Bee Burg says

    March 15, 2012 at 8:58 pm

    Hehe, that’s so cute!! 😀

    Reply
  6. Audrey Yeager says

    March 18, 2012 at 5:54 pm

    Oh my gosh this is so adorable!!!!!! I might have to try this! I am thinking I might put Easter eggs on mine…BEAUTIFUL job!

    Reply
  7. curlyqmosaics says

    March 19, 2012 at 12:05 am

    What a festive, sweet wreath! I am loving the fluffy green grass. TFS!

    Reply
  8. Bethany Crowell says

    March 19, 2012 at 12:50 am

    What fun that is! I might try to make one myself!

    Reply
  9. Patricia says

    March 19, 2012 at 1:36 am

    I love this! I did one with yarn and now I have to try with this. It really looks like grass. Just gorgeous!

    Reply
  10. Sarah says

    March 19, 2012 at 10:38 am

    This is so adorable! You did an awesome job!

    Reply
  11. Becki says

    March 19, 2012 at 6:49 pm

    Thanks everyone. Glad you like it! Thanks for stopping by and commenting! Such nice comments! 🙂

    Reply
  12. Cassie Box says

    March 29, 2012 at 11:36 pm

    Becki, this wreath is so amazing! I love that pink ribbon. Thank you so much for sharing it with Paper Issues!!! We featured you today: http://paperissues.blogspot.com/2012/03/spring-wreath.html

    Reply
  13. Bee's hive says

    March 30, 2012 at 4:31 am

    🙂

    Reply
  14. Becki says

    March 30, 2012 at 5:57 pm

    Thanks, Cassie! Such an honor!

    @Bee ;P

    Reply

Leave a Reply Cancel reply

Your email address will not be published. Required fields are marked *

This site uses Akismet to reduce spam. Learn how your comment data is processed.

About the Designer

Hi, I'm Rebecca. I am a child of God. A loving wife of 29 years. A boy mom. A collector of gadgets, gizmos, and superhero action figures. Making the world more organized one planner at a time. Read More…

  • Facebook
  • Instagram
  • Pinterest
  • Twitter

Looking for Something?

Categories

Copyright

You are welcome to feature or share any article, as long as you use only one image and link back to the specific post. You may NOT edit, crop, remove my watermark, or change my images in any way without written permission.

Republishing posts in their entirety is prohibited. If I somehow produce something that inspires you to create your own, please credit me and link back to my site. Thanks!
  • Blog
  • Home
  • Tutorials
  • About Me
  • Contact Me
  • 3D Projects
  • CGP VIP Group

Join us on Instagram

You asked. We’re answering. (Just… give us a m You asked. We’re answering.
(Just… give us a minute 😉)

We’re taking our most-loved functional inserts and rolling them into our gradient print lineup, starting with the classics you use every single month. This one’s the Monthly Bills tracker in Lilac Hex, and honestly… paired with pink? She understood the Valentine’s Day assignment 💕

More favorites. More gradients. Same no-nonsense function.
Slow rollout, zero chaos. Worth the wait.

💜💗

#plannerinserts #functionalplanning #billtracker #plannercommunity #plannerlove #gradientplanner #lilachex #pinkplanner #valentinesvibes #ringbinderplanner #planningwithstyle #stationerylove #plannerflatlay #organizedlife #citygirlplanners
From loose pages to a finished love story. 📓✨ From loose pages to a finished love story.
📓✨

This 6x8 spiral notebook pairs the Swept Away cover with our Botanical Notes dot grid inside—soft florals, clean space, and just enough structure to catch all the thoughts that refuse to stay quiet.

Printed, punched, coiled, trimmed—every step done by hand.
Because some stories deserve better than a boring notebook.

#spiralnotebook
#handmadepaper
#stationeryshop 
#notebookreel
#plannercommunity
#bookishvibes
#romancenotebook
We won’t lie, we miss the foil. ✨ But when our We won’t lie, we miss the foil. ✨
But when our foiling machine officially kicked the bucket, we rolled up our sleeves and got creative instead.

Meet the four new gradients stepping in as foil’s glow-up cousins. No drama, just smooth color and crisp prints. And judging by the reviews… yeah, people are loving them.

Sometimes Plan B turns out pretty darn good. 💁‍♀️
Thank goodness February is almost here! Thank goodness February is almost here!
Big Brew energy ☕️💗 Baby Brew (A5 bound not Big Brew energy ☕️💗
Baby Brew (A5 bound notebook) and Momma Brew (7x9 Complete Planner) out here proving once again that The Brew Review cover is that girl.

Same cozy vibes, different sizes, zero regrets.
Apparently, this cover didn't come to play... it came to sell. 😏
New year, same avoidance habits. January just hits New year, same avoidance habits.
January just hits different when you're still ignoring that thing. At least now it's documented
Sorry, I ramble on here but thought you all would Sorry, I ramble on here but thought you all would want to know. 😌
I tested both options, and honestly, the regular l I tested both options, and honestly, the regular lamination on the tabbed dividers holds up just fine. That means no extra steps and no unnecessary reinforcement. Always happy when the simpler option actually works.
I finished testing, and I'm almost ready to tell y I finished testing, and I'm almost ready to tell you which top tabs work best: reinforced edges on laminate or just our standard divider lamination. 👀
Follow Us!

Categories

Archives

Copyright © 2026 · HappyCardFactory Designs