HappyCardFactory Designs

Dream. Create. Inspire.

  • Shop
  • Facebook
  • Pinterest
  • Twitter
  • Instagram
  • Home
  • Our Store
  • Blog
  • Tutorials
  • 3D Projects
    • 3D Crafts
    • 3D Flowers
    • 3D Letters
  • Contact
  • About Me
    • About Me
    • Disclosure
    • Privacy Policy
  • Join Our Group
You are here: Home / Funtime / Monogrammed Mini Bags

Monogrammed Mini Bags

June 11, 2012 by Rebecca Wagner 8 Comments

Hello, Becki here with a new project  that I have been dying to try – rhinestones.  These little shiny stones have had me scared for quite a while but I toughened up and decided to give them a go.  Boy, am I glad I did.  I have no idea why I was so scared of them.  Now I am trying to think of other things to bling up!I thought for my first project I would go small and simple.  I was at my local hobby store and saw these little canvas bags.  I thought they would be great for my three nieces and I would have one left over for me!

As I am just learning how to use the rhinestone template material and this feature in Funtime, I went with just making initials.  I used the Hobo font that could with the software and brought a R, M, K, and A to my mat.  Used the rhinestone feature to change my font into circles to cut out in the template material.


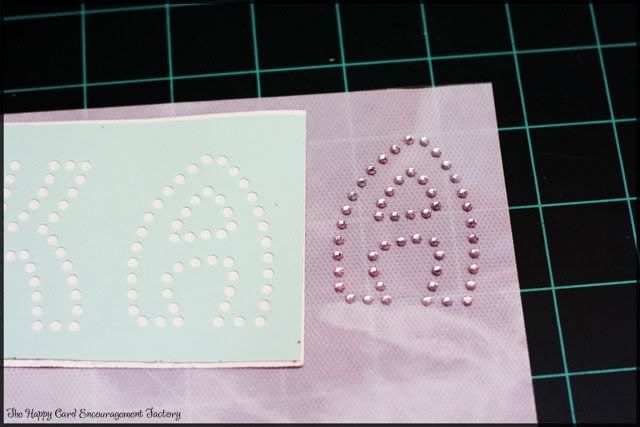
Here’s a picture of my cutout template and the rhinestones all ready to go on the transfer tape.   I used my deep cut blade on a force of 2 with a speed of 2 to cut the thick template.  Now I was ready to place the tape on my bag.


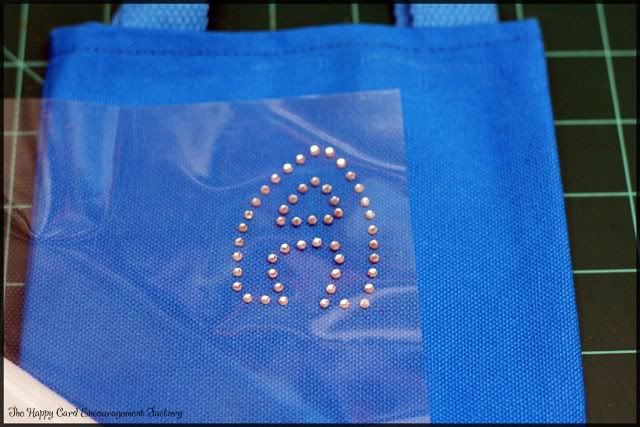
The initial is now ready to be ironed down.  I placed a pillowcase over the tape and held it over the stones for about 45 seconds on the Wool setting.  After it cooled for about 10 seconds I peeled up the tape making sure the rhinestones were affixed to the bag.  Once everything looked good, I turned the bag inside out and hit the backside with the iron for another 20 seconds to make sure they were really stuck.

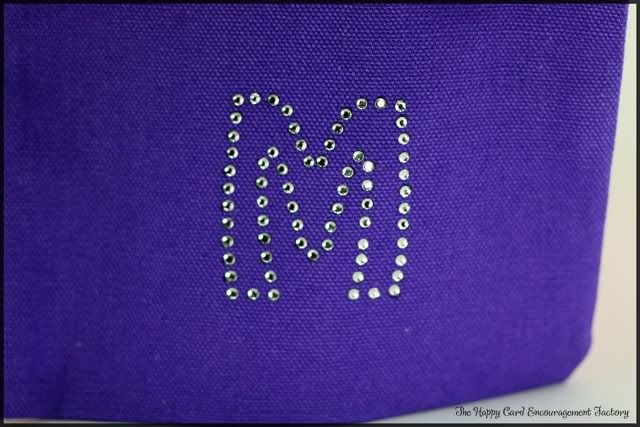
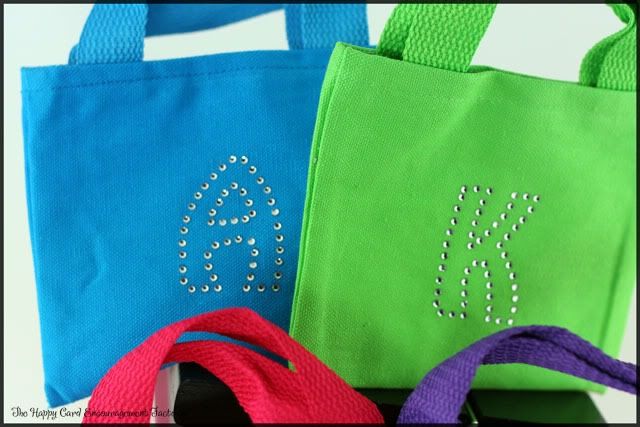
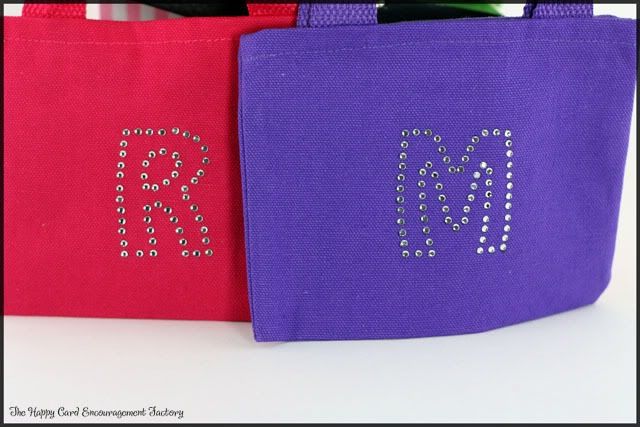
Take a look at how they turned out.  I think they are soooo cute!

Thanks for stopping by and taking a look.  Hope you aren’t as scared as me and get to using those rhinestones.  Have a great day and happy crafting!

Supplies:
10SS crystal rhinestones
rhinestone template material
rhinestone transfer tape
4 mini bags

Filed Under: Funtime, homemade, Monogram, Rhinestones

« Happy Anniversary to Me
Iris Folded Onesie »

Comments

  1. snappy scrappy says

    June 11, 2012 at 12:34 pm

    Super duper cute! Lee-Ann 🙂

    Reply
  2. HeatherLynn says

    June 11, 2012 at 6:23 pm

    Becki, your little bags turned out fab! Love them! TFS! ~HL

    Reply
  3. Trendy Twine says

    June 12, 2012 at 4:35 am

    Becki, these are fantastic. You are such a crafting guru 😉

    Lesley @ Trendy Twine

    Reply
  4. Rebecca Morefield-Wagner says

    June 12, 2012 at 4:40 am

    Thanks everyone! I appreciate you taking the time to comment.

    @Lesley – sure, sure 😉

    Reply
  5. MichelleMyBelle S. says

    June 12, 2012 at 12:45 pm

    this would make a great project for a little girls birthday party. Make one for each girl and fill with little goodies. Or, it could be a project for a girls sleep over. With moms help of course.

    Looks great! Love it. Just wish I had girls, LOL

    Reply
  6. Rebecca Morefield-Wagner says

    June 12, 2012 at 3:43 pm

    I sometimes wish I had girls too, Michelle. LOL

    Reply

Leave a Reply Cancel reply

Your email address will not be published. Required fields are marked *

This site uses Akismet to reduce spam. Learn how your comment data is processed.

About the Designer

Hi, I'm Rebecca. I am a child of God. A loving wife of 29 years. A boy mom. A collector of gadgets, gizmos, and superhero action figures. Making the world more organized one planner at a time. Read More…

  • Facebook
  • Instagram
  • Pinterest
  • Twitter

Looking for Something?

Categories

Copyright

You are welcome to feature or share any article, as long as you use only one image and link back to the specific post. You may NOT edit, crop, remove my watermark, or change my images in any way without written permission.

Republishing posts in their entirety is prohibited. If I somehow produce something that inspires you to create your own, please credit me and link back to my site. Thanks!
  • Blog
  • Home
  • Tutorials
  • About Me
  • Contact Me
  • 3D Projects
  • CGP VIP Group

Join us on Instagram

Now on to the cutting phase. #citygirlplanners # Now on to the cutting phase. 

#citygirlplanners #stationerylove #plannercommunity #behindthescenes
New notepads in the making. Any guesses? #citygir New notepads in the making. Any guesses?

#citygirlplanners #plannercommunity #plannerlove #citygirlplannersinserts
Nothing ruins a perfectly good month like… bills Nothing ruins a perfectly good month like… bills.

Good news: when everything’s written down, at least the chaos is organized.

Pay it. Check it off. Pretend you’re thriving.

#CityGirlPlanners #AdultingButMakeItCute #BillTracker #PlannerLife #OrganizedChaos
Personal Size planners get a bad rap for one reaso Personal Size planners get a bad rap for one reason…

They’re narrow.

And I get it.
Personal is the perfect middle ground. Bigger than Pocket, fits in your purse, but way more portable than A5.

But the width?
That’s always been the complaint.

Lately I’ve been seeing people try to squeeze Personal Wide into standard Personal binders… and then wonder why the pages stick out.

So instead of making it wider… I went the other direction.

Foldouts.

For 2026, I reworked the layout to give you more planning space without changing the footprint.

Month on one page
Straight into your weekly
Dashboard space (because you know I had to keep that)
And when it’s folded?
Standard Personal Size. Fits your binder like it should.

Now I need your opinion before I finalize this…

What works better in vertical boxes?

Graph (left side)
or
Lines (right side)

Tell me in the comments — Graph or Lines?
Who else misses Micro planners? I found this under Who else misses Micro planners? I found this under a stack of papers. Don’t know how long it’s been chillin under there but I’m going to start using it. Great for quick notes and things you need to dump but don’t need long term.
Field research, planner style. Since the Coach no Field research, planner style.

Since the Coach notebooks are sold out, I grabbed this leather cover on Amazon to test the fit.
Good news: it fits beautifully (and it’s roomy enough for tabs).

Bad news?
I got excited and didn’t read the whole listing.

No snap.
No elastic.
Just vibes.

Luckily I’ve got elastic on hand… but consider this your reminder from someone who learned the hard way:

Read the full listing, friends.

#plannerlife #plannercommunity #a5planner #plannerfinds #citygirlplanners
Sometimes the best combinations aren’t planned… they just happen.

The Aquarelle Sky cover paired with Candy Rush tabs turned out to be one of those moments. The colors line up so perfectly, it looks like they were made for each other.

Just a little unexpected color magic.
Every tab is placed by hand. Nothing here is auto Every tab is placed by hand.

Nothing here is automated. We print, cut, laminate, punch, and assemble every order ourselves.

When you shop with us, two real humans have touched every single piece.

#smallbusinesslife #madebyhand #behindthescenes #plannercommunity  #shopsmallbusiness
Does anyone else suddenly become a pink-and-purple Does anyone else suddenly become a pink-and-purple person in February…
or is it just me?

I don’t even fight it anymore.
February = soft colors, cozy plans, and a planner that matches the mood. 💕

#februaryvibes #plannercommunity #pinkplanner #plannerlove #citygirlplanners
Follow Us!

Categories

Archives

Copyright © 2026 · HappyCardFactory Designs